Hey there, fellow BJD enthusiasts! It’s your seasoned BJD pal here, with over 15 years of navigating the wonderful, sometimes quirky, world of ball-jointed dolls. I remember my very first BJD like it was yesterday – a beautiful, delicate creature that quickly became a beloved member of my collection. But, like all things cherished, she eventually started to show signs of wear, specifically in her joints. She became a bit wobbly, her poses less stable, and frankly, a little less joyful to handle.
Back then, the idea of “restringing” or “tightening” her felt like a monumental task, shrouded in mystery and fear of breaking my precious doll. I vividly recall my first attempt at DIY tightening: a tangled mess of fishing line, a pair of kitchen scissors, and a whole lot of frustration. My doll ended up looking more like a marionette in distress than a graceful BJD. It was a classic “hand-flailing, utterly confused” beginner moment.
But through trial and error, countless hours of research, and the invaluable wisdom shared within our amazing BJD community, I discovered the magic of the BJD stringing kit. This wasn’t just a collection of tools; it was a gateway to empowerment, transforming me from a fumbling novice into someone who could confidently restore my dolls to their former glory. The shift from “clumsy chaos” to “effortless expertise” was truly liberating. This article is born from that journey, designed to be your trusted guide, helping you achieve professional results and ensure your dolls remain happy and poseable for years to come.
Why is this so crucial? A well-strung BJD isn’t just about aesthetics; it’s about functionality and longevity. Loose joints can lead to frustrating posing limitations, but more importantly, they can cause undue stress on the resin itself, potentially leading to chips, cracks, or even breakage over time. Investing in a quality BJD stringing kit and learning how to use it is an act of love and responsible doll ownership, protecting your investment and enhancing your enjoyment. This guide will walk you through everything you need to know, from understanding the components of an elastic stringing kit for BJD DIY to mastering the art of tightening, ensuring your dolls stand tall and proud.
What is a BJD Stringing Kit? A Beginner’s Guide to Essential Tools
So, what exactly is a BJD stringing kit? At its core, it’s a specialized collection of tools and materials designed to help you maintain and restore the internal elastic stringing of your ball-jointed doll. Think of it as a first-aid kit for your doll’s skeletal system. The elastic cord inside your BJD is what holds all the resin parts together, providing tension for posing and stability. Over time, this elastic can stretch, fray, or even break, leading to loose joints and a doll that struggles to hold a pose. That’s where the kit comes in.
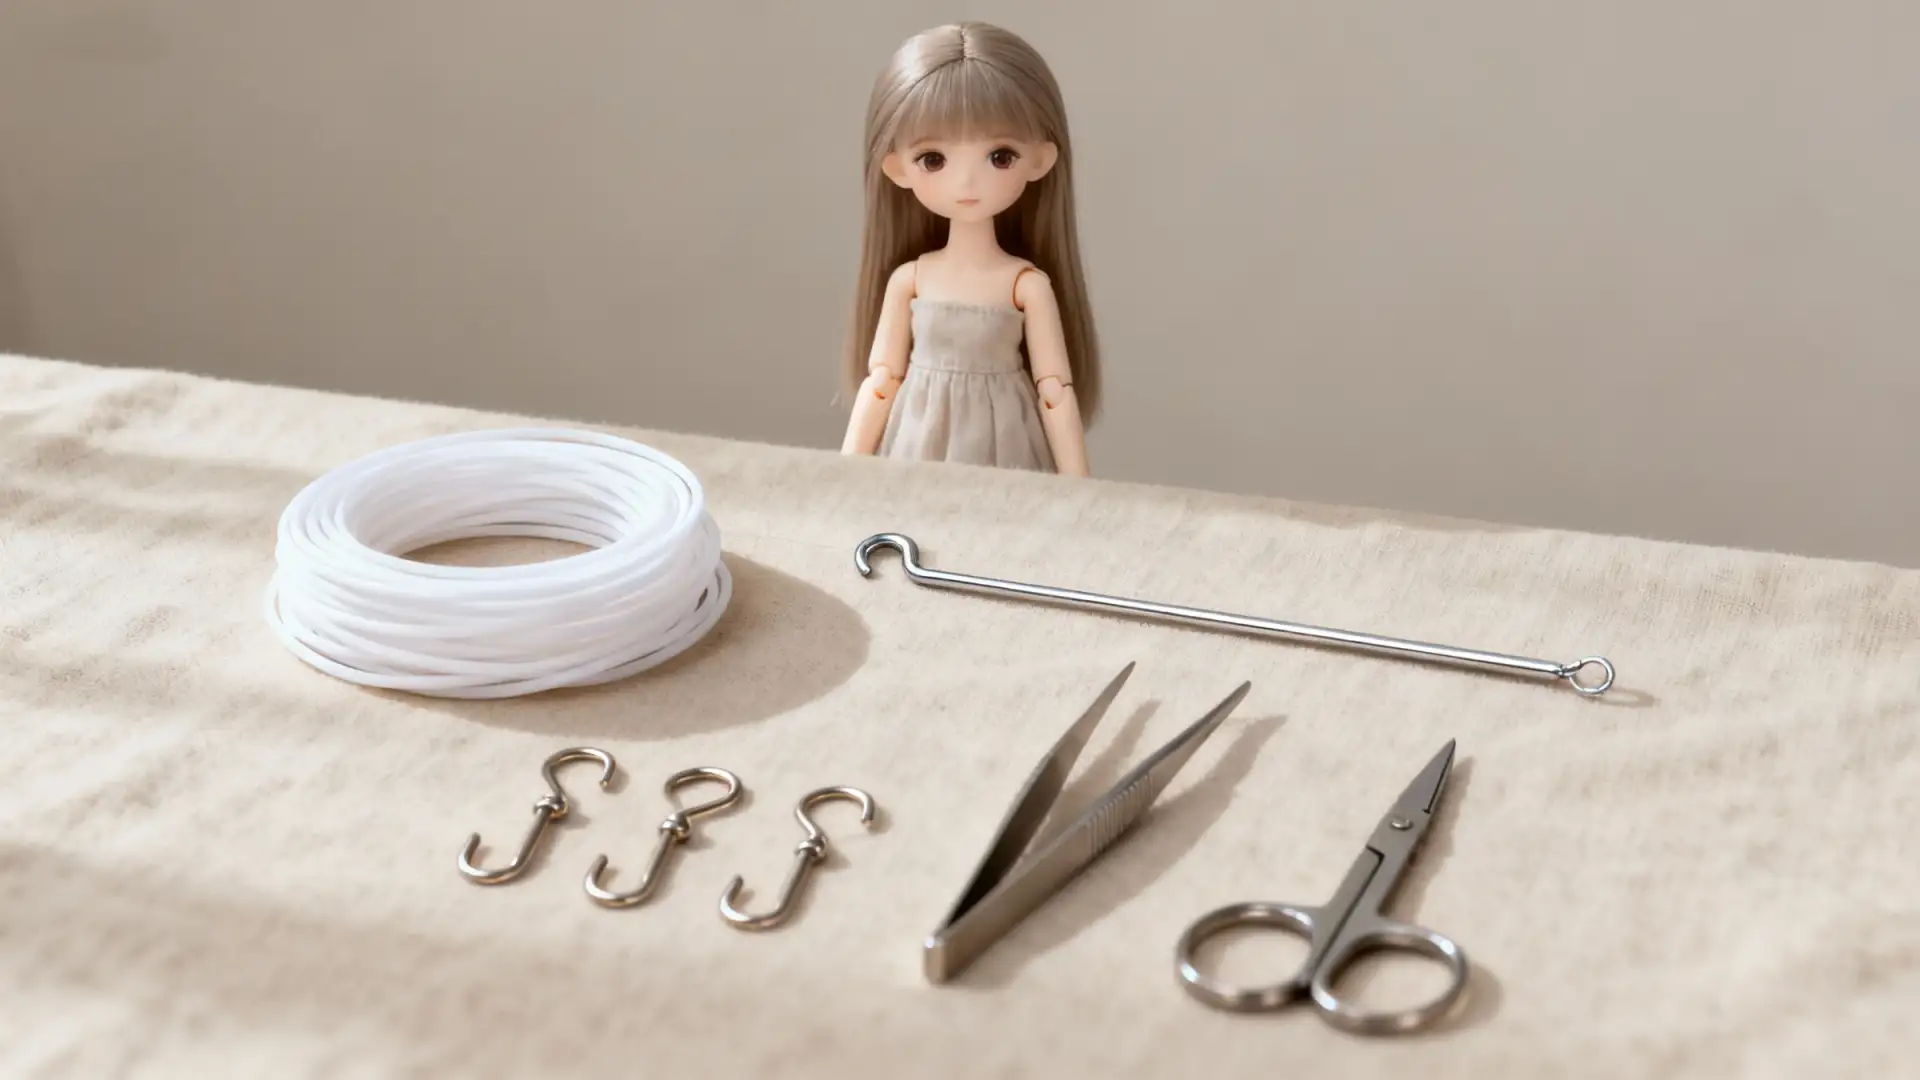
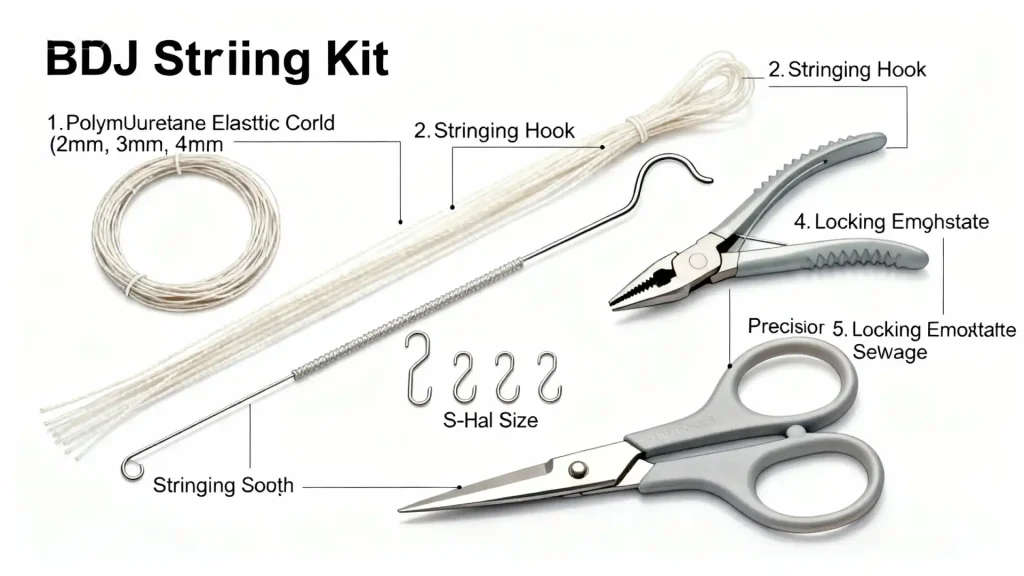
From my extensive experience, I’ve seen countless variations of these kits, but the fundamental components remain consistent. A good kit will typically include:
- Elastic Cord: This is the lifeline of your BJD. I’ve experimented with various types over the years. Early on, I used a lot of basic white elastic, which often degraded quickly. Now, I primarily recommend high-quality polyurethane (PU) elastic or durable latex-based elastic. PU elastic, while sometimes a bit stiffer to work with, offers superior longevity and resistance to UV light and oils, making it a fantastic choice for long-term tension. Latex elastic, on the other hand, is often softer and easier to knot, providing a good balance of flexibility and strength, though it can degrade faster if exposed to certain chemicals or light.
- Elastic Cord Sizing: For different BJD sizes, the cord thickness is crucial. Using the correct size ensures proper tension without straining the resin.
- YoSD (1/6 scale): Typically 2mm or 2.5mm
- MSD (1/4 scale): Often 2.5mm or 3mm
- SD (1/3 scale): Usually 3mm or 4mm
- Larger dolls (70cm+): May require 4mm or even 5mm elastic.
- S-Hooks or Metal Connectors: These are used to connect the elastic loops, particularly in the torso and leg sections, allowing for easier assembly and adjustment.
- Stringing Hook/Wire: This is an indispensable tool, often a long, thin wire with a hook at one end, used to guide the elastic through the doll’s limbs and head. I’ve tried using makeshift alternatives like coat hangers, but nothing beats a dedicated stringing hook for ease and safety.
- Hemostats/Forceps: These are incredibly useful for gripping the elastic firmly, especially when pulling it through tight spaces or tying knots. They provide a level of control that fingers simply can’t match.
- Scissors: Sharp, small scissors are essential for cleanly cutting the elastic without fraying.
- Optional but Recommended:
- Doll Stand: To hold your doll securely during the process.
- Protective Mat: To prevent scratches on your workspace and doll.
- Gloves: To keep oils from your hands off the resin.
Understanding these components is the first step in mastering the elastic stringing kit for BJD DIY. Knowing the properties of different elastic types and the specific tools available will significantly enhance your restringing experience and the overall health of your doll.
Why You Need a BJD Stringing Kit: The Pro Insights for Doll Longevity
As a seasoned collector, I can’t stress enough why every BJD owner, especially beginners, should invest in a proper BJD stringing kit. It’s not just about fixing a problem; it’s about proactive maintenance and ensuring the long-term health and poseability of your cherished doll. While it might seem like an extra expense upfront, consider it an investment that saves you potential headaches and costly repairs down the line.
One of the biggest misconceptions I’ve encountered is the idea that you can just “make do” with household items. I’ve seen people attempt to use rubber bands, fishing line, or even regular sewing elastic. While these might offer a temporary fix, they are rarely suitable for the unique demands of BJD stringing.
Risk 1: Resin Damage from Incorrect Materials
Regular rubber bands degrade quickly, become brittle, and can snap unexpectedly, potentially damaging the resin. Fishing line offers no elasticity, making posing impossible and putting immense strain on the joint areas. Using the wrong materials can cause friction, chipping, or even stress cracks in the delicate resin, particularly around the stringing channels and joint cups. This is a heartbreaking and often expensive repair.
Risk 2: Shortened Lifespan and Poor Posing
The internal elastic is designed to last for years, but using inferior substitutes drastically reduces its lifespan, meaning you’ll be restringing more often. Without the correct elastic and tension, your doll will struggle to hold poses, leading to frustration and limiting your enjoyment.
Many reputable BJD brands, like Volks or Dollfie Dream, often provide specific recommendations for elastic types and sizes, emphasizing the importance of using materials designed for BJDs. This isn’t just a marketing ploy; it’s based on years of engineering and understanding the unique physics of these dolls. They prioritize materials that offer consistent tension, durability, and resin compatibility.
A dedicated BJD restringing tools and guide not only provides the right materials but also the specialized tools that make the process safer and more efficient. Trying to thread elastic through a tiny head cap with regular tweezers is an exercise in futility and frustration. Hemostats and stringing hooks are designed precisely for these tasks, minimizing the risk of accidental scratches or damage to your doll.
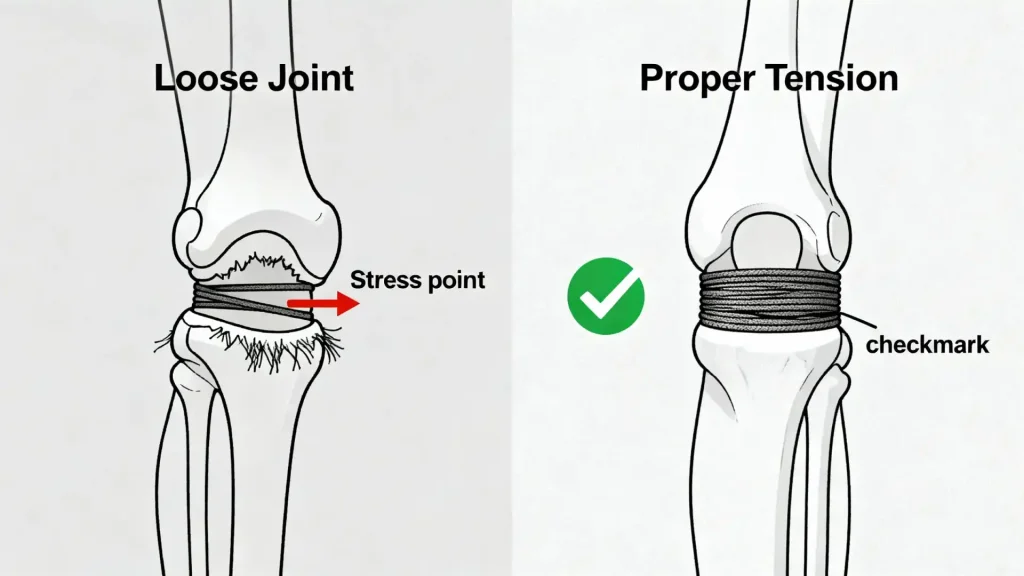
Furthermore, understanding and maintaining BJD joint tension is key to preventing issues. Over-tightening can put excessive stress on the resin, leading to cracks, especially in thinner areas like wrists or ankles. Under-tightening, as we’ve discussed, leads to floppiness. A proper kit and guide help you achieve that perfect balance, ensuring your doll is firm enough to hold dynamic poses but not so tight that it risks damage. This proactive approach ensures your doll remains a joy to interact with for many years, preserving its beauty and functionality.
How to Choose the Best BJD Stringing Kit for Beginners: My Top Recommendations
Navigating the world of BJD supplies can be overwhelming, especially when you’re just starting out. When it comes to choosing the best BJD stringing kit for beginners, my advice comes from years of trying various products and learning what truly works. You want a kit that’s comprehensive, user-friendly, and provides quality materials that won’t let you down. Don’t fall for overly cheap kits that might compromise on elastic quality or tool durability.
Here are my top recommendations and the key factors to consider:
- Comprehensive Tool Set: Look for kits that include all the essentials: a good quality stringing hook, a pair of hemostats (preferably locking ones for better grip), sharp scissors, and S-hooks. Some kits might also include a small awl or a pair of tweezers, which can be helpful. A complete set means you won’t be scrambling for makeshift tools mid-restring.
- High-Quality Elastic Cord: This is non-negotiable. Prioritize kits that specify the type of elastic, such as polyurethane (PU) or durable latex. Avoid generic “elastic cord” without further description. A good kit will often include a generous length of elastic, sometimes even in multiple sizes (e.g., 2.5mm, 3mm, 4mm) to accommodate different doll scales. For an SD doll, you’ll typically need about 2-3 meters of elastic, so ensure the kit provides ample length.
- Clear Instructions/Guide: While this article serves as a guide, a kit that comes with its own basic instructions or a link to a video tutorial is a huge bonus for beginners. It shows the seller cares about your success.
- Spare Parts & Accessories: Does the kit include extra S-hooks? Maybe a few different sizes of elastic? These small additions can make a big difference, especially if you’re prone to losing tiny parts or want to experiment with different tensions.
- User Reviews and Seller Reputation: Always check reviews! What are other beginners saying about the kit? Is the seller known for quality BJD supplies? Platforms like Etsy or specialized BJD stores often have detailed reviews that can guide your decision. Price is a factor, but don’t let it be the only factor. A slightly more expensive kit with rave reviews is often a better investment than a cheap one that causes frustration.
My Specific Recommendations (based on general types, as brands can vary):
- The “All-in-One” Starter Kit: Many BJD supply shops (like Denver Doll Emporium, Alice’s Collections, or even some Etsy sellers specializing in BJD tools) offer comprehensive starter kits. These often include a good selection of elastic sizes, a sturdy stringing hook, hemostats, and S-hooks. They are designed with beginners in mind, offering a balanced selection of tools and materials.
- The “Elastic Focus” Kit: If you already have some basic tools, consider a kit that focuses primarily on providing a variety of high-quality elastic cords. While some doll manufacturers like Luts do sell elastic, I generally recommend suppliers specializing in BJD maintenance for a wider, more consistent range of elastic types and sizes. This is great for stocking up on different sizes for your growing collection.
- The “DIY Enthusiast” Kit: For those who like to customize, some kits might offer a wider range of S-hook sizes, different types of stringing hooks (e.g., with a handle vs. just wire), or even small tools for knot-tying. These are often found on Etsy from independent sellers who cater to specific BJD needs.
Remember, the goal is to find a kit that empowers you, not one that adds to your stress. Choose wisely, and you’ll be well on your way to becoming a BJD restringing pro!
DIY Tightening with Pro Results: A Step-by-Step BJD Stringing Tutorial
Alright, BJD fam, this is where the rubber meets the road – or rather, where the elastic meets the resin! Don’t be intimidated; with your new BJD stringing kit and this detailed guide, you’ll be tightening those joints like a pro. I’ve learned a lot from my own mistakes, like the time I almost lost an S-hook inside a doll’s leg, so I’ll share all my little tricks and safety tips. This is your comprehensive BJD stringing tutorial for beginners, designed to make the process smooth and successful.
Step 1: Prepare Your Tools and Workspace
Before you even think about disassembling your doll, set yourself up for success.
- Gather Your Kit: Lay out all your tools: elastic cord (the correct size for your doll), stringing hook, hemostats, S-hooks, and scissors.
- Clear, Well-Lit Workspace: Choose a clean, flat surface. I always use a soft, non-slip mat (like a yoga mat or a piece of felt) to protect both my doll and the table. This prevents scratches and stops tiny parts from rolling away.
- Reference Photos: If this is your first time with this particular doll, take photos of how the elastic is currently strung, especially the knot configurations. This is a lifesaver for reassembly!
- Safety First: If children are present, ensure they are supervised, especially when using sharp tools like scissors or pointed stringing hooks.
Step 2: Disassemble the Doll
This is often the most nerve-wracking part for beginners, but it’s straightforward.
- Remove Head: Gently remove the doll’s head. Most BJD heads are held on by tension from the neck elastic.
- Remove Limbs: Carefully unhook or untie the elastic from the arms and legs. Start with one limb at a time if you’re nervous. I usually start with the legs, then the arms.
- Separate Torso: If your doll has a multi-part torso, you may need to separate the upper and lower torso sections.
- Keep Parts Organized: Place all parts in a logical order. I use small bowls or trays to keep hands, feet, and head separate.
Step 3: Remove Old Elastic
Once disassembled, you’ll need to remove the old, stretched-out elastic.
- Untie Knots: Carefully untie any knots holding the elastic. If they’re too tight, you might need to cut them.
- Pull Out Elastic: Gently pull the old elastic out of each body part. Inspect the internal channels for any debris or damage.
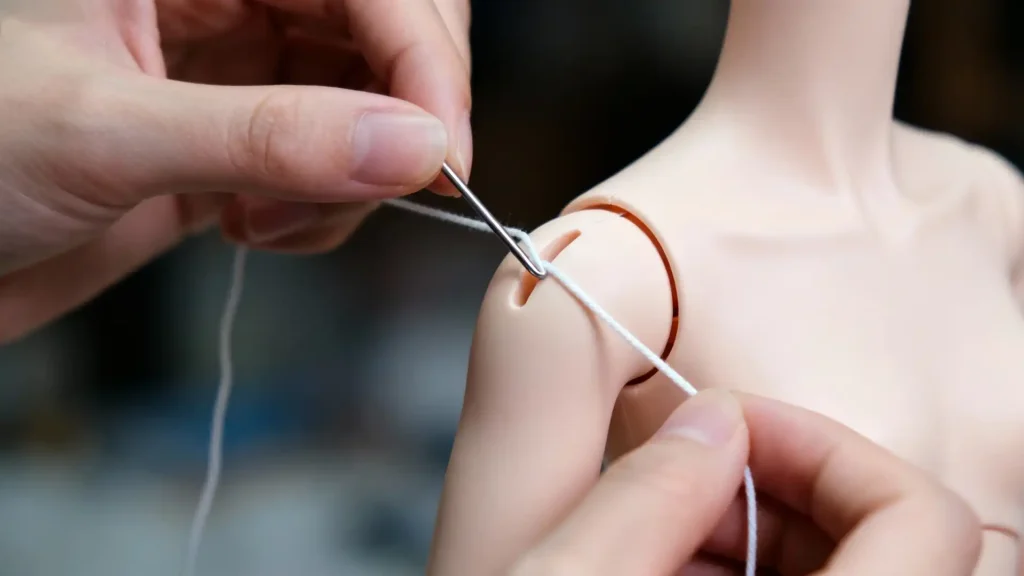
Step 4: Threading New Elastic
This is the core of the process. We’ll focus on a common stringing method for SD-sized dolls, which involves two main loops: one for the arms and head, and one for the legs.
- Arm/Head Loop:
- Cut a generous length of new elastic (e.g., 1.5-2 meters for an SD).
- Thread one end of the elastic through one arm, then through the shoulder joint, across the upper torso, through the other shoulder joint, and out the other arm.
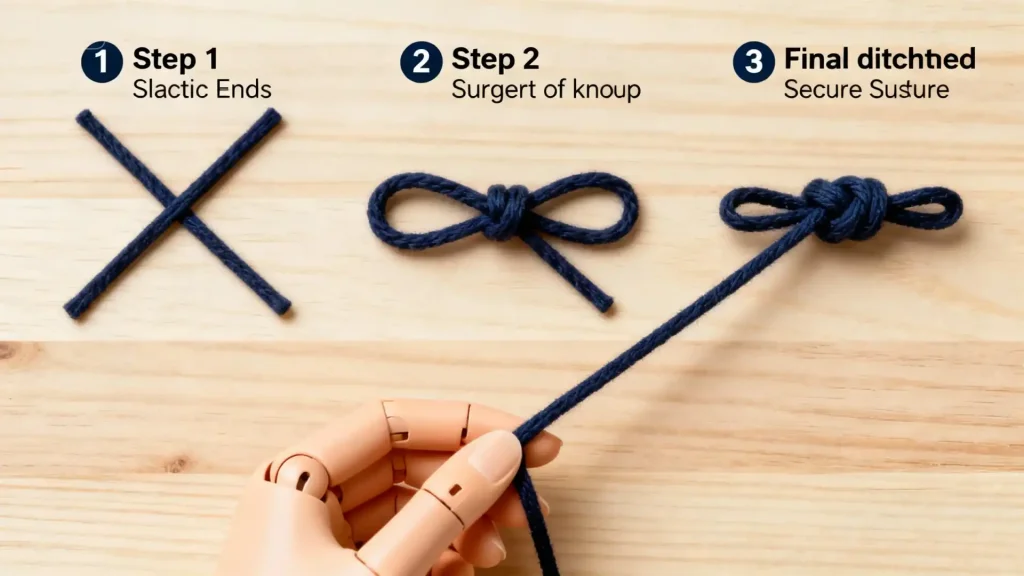
- Tie a secure knot (a surgeon’s knot or a double overhand knot works well) to form a loop. Ensure the knot is small enough to fit inside the arm or torso.
- Now, using your stringing hook, guide the elastic from the neck opening, down through the torso, and out the bottom opening. This loop will eventually connect to the head.
- Leg Loop:
- Cut another generous length of elastic.
- Thread one end through one leg, then through the hip joint, across the lower torso, through the other hip joint, and out the other leg.
- Tie a secure knot to form a loop.
- Using your stringing hook, guide the elastic from the bottom opening of the torso, up through the torso, and out the top opening.
Step 5: Testing and Adjusting Tension
This is where you achieve that “pro result.” This is also where my personal trick of “how to judge appropriate tension” comes in.
- Connect Limbs: Reattach the arms and legs to their respective elastic loops. You’ll likely use S-hooks to connect the leg loop to the torso’s bottom elastic, and the arm loop to the torso’s top elastic.
- The “Lift Test”: My go-to method for judging tension: Hold the doll by its torso. The limbs should hang naturally but not flop around. When you lift an arm or leg to a horizontal position, it should stay there without immediately dropping. If it drops, it’s too loose. If it’s extremely difficult to move, it’s too tight.
- Adjusting Tension: This is often done by adjusting the length of the elastic loops or by re-tying knots. Hemostats are invaluable here for gripping the elastic while you pull and tie. For the head, you’ll pull the neck elastic through the head cap and tie a knot, adjusting until the head sits firmly but can still turn.
- DIY BJD stringing tips and tricks:
- Pre-stretch the elastic: Before stringing, gently stretch the elastic a few times. This helps it settle and reduces the chance of it loosening quickly after assembly.
- Use a “helper” string: For particularly tricky areas, tie a thin piece of dental floss or strong thread to the end of your elastic. This can make it easier to guide through tight channels.
- Work on a soft surface: Always, always work on a padded surface to prevent scratches or chips if a part slips.
- Don’t over-tighten: This is a common beginner mistake. Over-tightening can stress the resin and make posing stiff and unnatural. Aim for firm but flexible.
Step 6: Reassemble Your Doll
Once you’re satisfied with the tension, it’s time to put your doll back together.
- Reattach Head: Carefully place the head back on the neck.
- Check All Joints: Move each joint through its full range of motion. Does it feel smooth? Does it hold its pose?
- Admire Your Work: You’ve done it! Your doll should now stand tall, pose beautifully, and feel wonderfully firm.
This detailed BJD restringing tools and guide should give you the confidence to tackle your doll’s maintenance. Remember, practice makes perfect, and your doll will thank you for the care!
Troubleshooting Common BJD Stringing Problems & Solutions
Even with the best BJD stringing kit and a detailed tutorial, you might encounter a few bumps along the road. Don’t worry, these are common issues, and I’ve faced them all! Here are some common BJD stringing problems and solutions that will help you navigate any challenges. Welcome to the club – we’ve all got our “disaster stories” to share in the forums or Discord!
- Problem 1: Doll is still floppy after restringing.
- Cause: The elastic is likely too long or not tight enough. It could also be that the elastic itself has stretched out quickly (if it’s low quality).
- Solution: Disassemble the affected limb(s) or section. Pull the elastic tighter and re-tie the knot, ensuring it’s secure. If the elastic feels weak or overly stretchy, consider replacing it with a higher-quality, slightly thicker cord. Remember the “lift test” from the tutorial – the limb should stay put when lifted horizontally.
- Problem 2: Joints are too stiff, and posing is difficult.
- Cause: The elastic is too short or over-tightened. This puts excessive strain on the resin.
- Solution: This is less common than floppiness but can be more damaging. You’ll need to loosen the tension. Disassemble the doll and re-tie the knots, leaving a bit more slack in the elastic. It’s a delicate balance, so make small adjustments. If you’ve cut the elastic too short, you might need to replace that section.
- Problem 3: Elastic keeps slipping out of the S-hook or knot comes undone.
- Cause: The S-hook might be too open, or the knot isn’t secure enough.
- Solution: For S-hooks, you can gently pinch them closed a bit with pliers (be careful not to damage the plastic coating if it has one). For knots, ensure you’re using a strong, reliable knot like a surgeon’s knot or a double overhand knot. Always pull the knot very tight to prevent slippage. Sometimes, a tiny drop of super glue on the knot (once you’re absolutely sure of the tension) can provide extra security, but be extremely careful not to get it on the resin.
- Problem 4: Difficulty threading elastic through small channels (e.g., fingers, head).
- Cause: Small openings, friction, or a stringing hook that’s too thick.
- Solution: Use a thinner stringing hook if available. For very tight spots, try the “helper string” trick mentioned earlier – tie a thin piece of dental floss to the elastic and use that to pull it through. A small amount of cornstarch or talcum powder can sometimes reduce friction inside the channels, but use sparingly.
- Problem 5: The doll’s head keeps falling off or is too loose/tight.
- Cause: Incorrect tension on the neck elastic.
- Solution: The head elastic is usually a separate loop or part of the arm loop. Adjust the knot inside the head cap. If the head is too loose, pull the elastic tighter and re-tie. If it’s too tight, loosen it slightly. The head should be able to turn smoothly but not wobble excessively.
These solutions should cover most of the issues you’ll encounter. Remember, patience is key, and don’t be afraid to undo and redo if something doesn’t feel right. Your goal is a happy, stable doll, and sometimes that takes a few tries to get just right.
Where to Buy BJD Maintenance Kits Online: Trusted Sources
Now that you’re armed with knowledge, you’re probably wondering, “Where can I buy BJD maintenance kit online?” Finding reliable sources is crucial to ensure you’re getting quality tools and elastic that won’t damage your precious dolls. Over my 15 years, I’ve seen many shops come and go, but a few have consistently stood out for their quality, customer service, and understanding of the BJD hobby.
Here are some trusted online sources I recommend, along with what makes them great:
- Specialized BJD Retailers: These are often your best bet. Websites like Denver Doll Emporium, Alice’s Collections, The Doll Peddler, or Jpop Dolls (depending on your region) are dedicated to BJD sales and supplies.
- Pros: They typically stock high-quality, BJD-specific elastic (often from reputable Korean or Japanese manufacturers), specialized stringing tools, and often have staff who are knowledgeable about BJDs. Their product descriptions are usually very detailed, and they often cater to different doll sizes.
- Cons: Prices can sometimes be a bit higher than general craft stores, and shipping times can vary, especially for international orders.
- Tip: Check their “Supplies” or “Maintenance” sections. They often have pre-assembled BJD stringing kits or allow you to buy components individually.
- Etsy (Independent Sellers): Etsy is a treasure trove for unique BJD items, and that includes maintenance kits. Many independent sellers who are BJD enthusiasts themselves create and curate excellent kits.
- Pros: You can often find very thoughtfully assembled kits, sometimes with unique or handmade tools. Sellers are usually very responsive and passionate about the hobby. You might find kits tailored to specific doll sizes or with a wider variety of elastic colors.
- Cons: Quality can vary between sellers, so it’s absolutely essential to check seller reviews and product descriptions thoroughly. Look for sellers with a high rating and positive feedback specifically about their stringing supplies.
- Tip: Search for “BJD stringing kit,” “BJD elastic,” or “BJD tools.” Don’t hesitate to message a seller with questions about their elastic types or tool materials.
- Amazon/eBay (with caution): While you can find BJD supplies on these larger marketplaces, you need to exercise more caution.
- Pros: Wide selection, competitive pricing, and often faster shipping (especially with Amazon Prime).
- Cons: Quality control can be inconsistent. Many generic “elastic cords” might not be suitable for BJDs, and tools might be lower quality. It’s harder to verify if the elastic is truly polyurethane or a durable latex.
- Tip: Look for listings specifically mentioning “BJD elastic” or “BJD stringing tools.” Read reviews carefully, paying attention to comments about durability and suitability for dolls. Prioritize sellers who specialize in craft or doll supplies rather than general merchandise.
When making your purchase, always prioritize the quality of the elastic and the durability of the tools. A good BJD stringing kit is an investment in your doll’s longevity and your peace of mind. Don’t be afraid to compare prices and read reviews, but remember that sometimes paying a little more for a trusted source can save you a lot of trouble in the long run.
FAQ: Your Burning Questions About BJD Stringing Kits Answered
As a long-time BJD collector, I’ve heard every question under the sun about stringing and maintenance. Here are some of the most common queries I get, along with my seasoned advice, incorporating the wisdom of the BJD stringing kit.
- Q: How often should I restring my BJD?
- A: There’s no hard and fast rule, as it depends on how often you pose your doll, the quality of the elastic, and even environmental factors. Generally, a well-strung BJD with good quality elastic might need restringing every 2-5 years. However, if you notice your doll becoming wobbly, struggling to hold poses, or if the elastic looks frayed, it’s time for a check-up with your BJD stringing kit. Some collectors restring annually as part of their routine maintenance.
- Q: What if the elastic breaks during DIY?
- A: Don’t panic! This happens, especially if the elastic was old or you’re new to the process. The beauty of having a BJD stringing kit is that you have spare elastic. Simply remove the broken pieces, and start the stringing process for that section again with a fresh piece of elastic. It’s a minor setback, not a disaster.
- Q: Can I use regular elastic bands for BJD stringing?
- A: Absolutely not! This is one of the most common mistakes beginners make. Regular elastic bands (like office supplies) are made from different materials, degrade very quickly, become brittle, and can snap, potentially damaging your doll’s resin. They also don’t provide the consistent, long-lasting tension required for BJD posing. Always use specialized BJD elastic, which is typically polyurethane or a high-quality latex blend, found in a proper elastic stringing kit for BJD DIY.
- Q: What are the signs my BJD needs restringing?
- A: Your doll will tell you! The most obvious sign is floppiness. If your doll can’t stand on its own, struggles to hold a pose (e.g., arms dropping, legs splaying), or feels generally loose and wobbly, it’s a clear indicator. Other signs include visible fraying or thinning of the elastic inside the joints, or if the doll’s head feels too loose and prone to falling off. These are all signals that it’s time to consult your BJD restringing tools and guide.
- Q: Is it okay to mix different types or brands of elastic in one doll?
- A: While generally not recommended for optimal consistency, it’s usually fine if you’re using high-quality BJD-specific elastic. For example, you might use a slightly thicker elastic for the legs for better stability and a thinner one for the arms for more delicate posing. However, avoid mixing very different types (e.g., a super stretchy one with a very stiff one) as this can lead to uneven tension and posing issues. Stick to the recommended BJD elastic cord types and sizes for your doll’s scale.
- Q: How do I know what size elastic to use for my doll?
- A: This depends on your doll’s scale (YoSD, MSD, SD, etc.) and sometimes the specific sculpt. As a general rule, smaller dolls (YoSD) use thinner elastic (2-2.5mm), while larger dolls (SD, 70cm+) use thicker elastic (3-4mm, sometimes 5mm). Many BJD retailers will list recommended elastic sizes for their dolls. When in doubt, start with the middle of the recommended range for your doll’s size, and adjust if needed. Your BJD stringing kit should ideally come with a few common sizes.
Conclusion: Start Your BJD DIY Journey with Confidence and Care

And there you have it, my dear BJD friends! We’ve journeyed from the initial apprehension of a wobbly doll to the empowering confidence of mastering your own BJD stringing kit. My 15 years in this hobby have taught me that the joy of BJD ownership extends far beyond simply collecting; it’s about the connection, the creativity, and the care we pour into these beautiful works of art. Learning to DIY tighten your doll’s joints isn’t just a chore; it’s a vital skill that ensures their longevity, enhances their poseability, and deepens your bond with them.
Remember, every seasoned collector started as a beginner, fumbling with tools and perhaps making a few mistakes along the way. The key is to embrace the learning process, arm yourself with the right knowledge and the right BJD stringing kit, and approach each task with patience and care. Your doll is a delicate creation, and with the insights shared in this guide, you’re now equipped to provide the professional maintenance it deserves.
So, go forth with confidence! Gather your tools, set up your workspace, and embark on this rewarding aspect of BJD ownership. Your dolls will thank you for it, standing tall and posing beautifully for many years to come. Welcome to the ever-growing family of empowered BJD enthusiasts!
Share your BJD restringing experiences and tips in the comments below – let’s keep the knowledge flowing! Happy stringing!
BJD Customization & Maintenance Series
- Your 2025 BJD Faceup Tutorial: A Pro’s Guide to Soulful Art
- How to String a BJD: A Veteran’s No-Nonsense Guide
- Pristine Resin: How to Clean a BJD Doll The Right Way
- BJD Customization: The Ultimate Guide to Personalizing Your Doll
- BJD Body Blushing: The Alchemist’s Guide to Skin That Breathes
- Make BJD Doll Eyes: An Alchemist’s Guide to Painting Soulful Gaze
- BJD Wig Styling Mastery: The Ultimate Care, Cutting & Customization Guide
- The Ultimate BJD Clothing Guide: Design, Patterns & Fit
- Ultimate BJD Storage Guide: Beat Yellowing with Pro Display Ideas
- BJD Faceup Pricing Guide: Unpacking Custom Eye Chips & Lip Blushing Costs
- Bringing Them Back to Life: Your Guide to BJD Restoration Service for Broken Fingers & Yellowed Resin
- BJD Stringing Kits: DIY Tightening for Stable, Pro Posing (You are here)
- BJD Customization Services: Faceup & Full Body Blushing Guide
- BJD Body Modification: Sculpting Your Doll‘s Unique Form (2025 Guide)
- Mastering BJD Seam Sanding: A Pro’s Guide to Flawless Resin Finishes
- BJD Joint Maintenance: Keeping Your Doll Posing Perfectly for Years
- BJD Eye Well Modification: Achieving Deeper, More Expressive Gaze
- Mastering Advanced BJD Faceups: Beyond Basics to Lifelike Artistry
- BJD Resin Whitening & Anti-Yellowing: A Collector’s Proven Guide to Preserve Beauty
- BJD Stringing Tension Guide: Optimizing Posing & Stability
- BJD Magnet Installation: The Ultimate Safety Guide to Unlocking Dynamic Posing