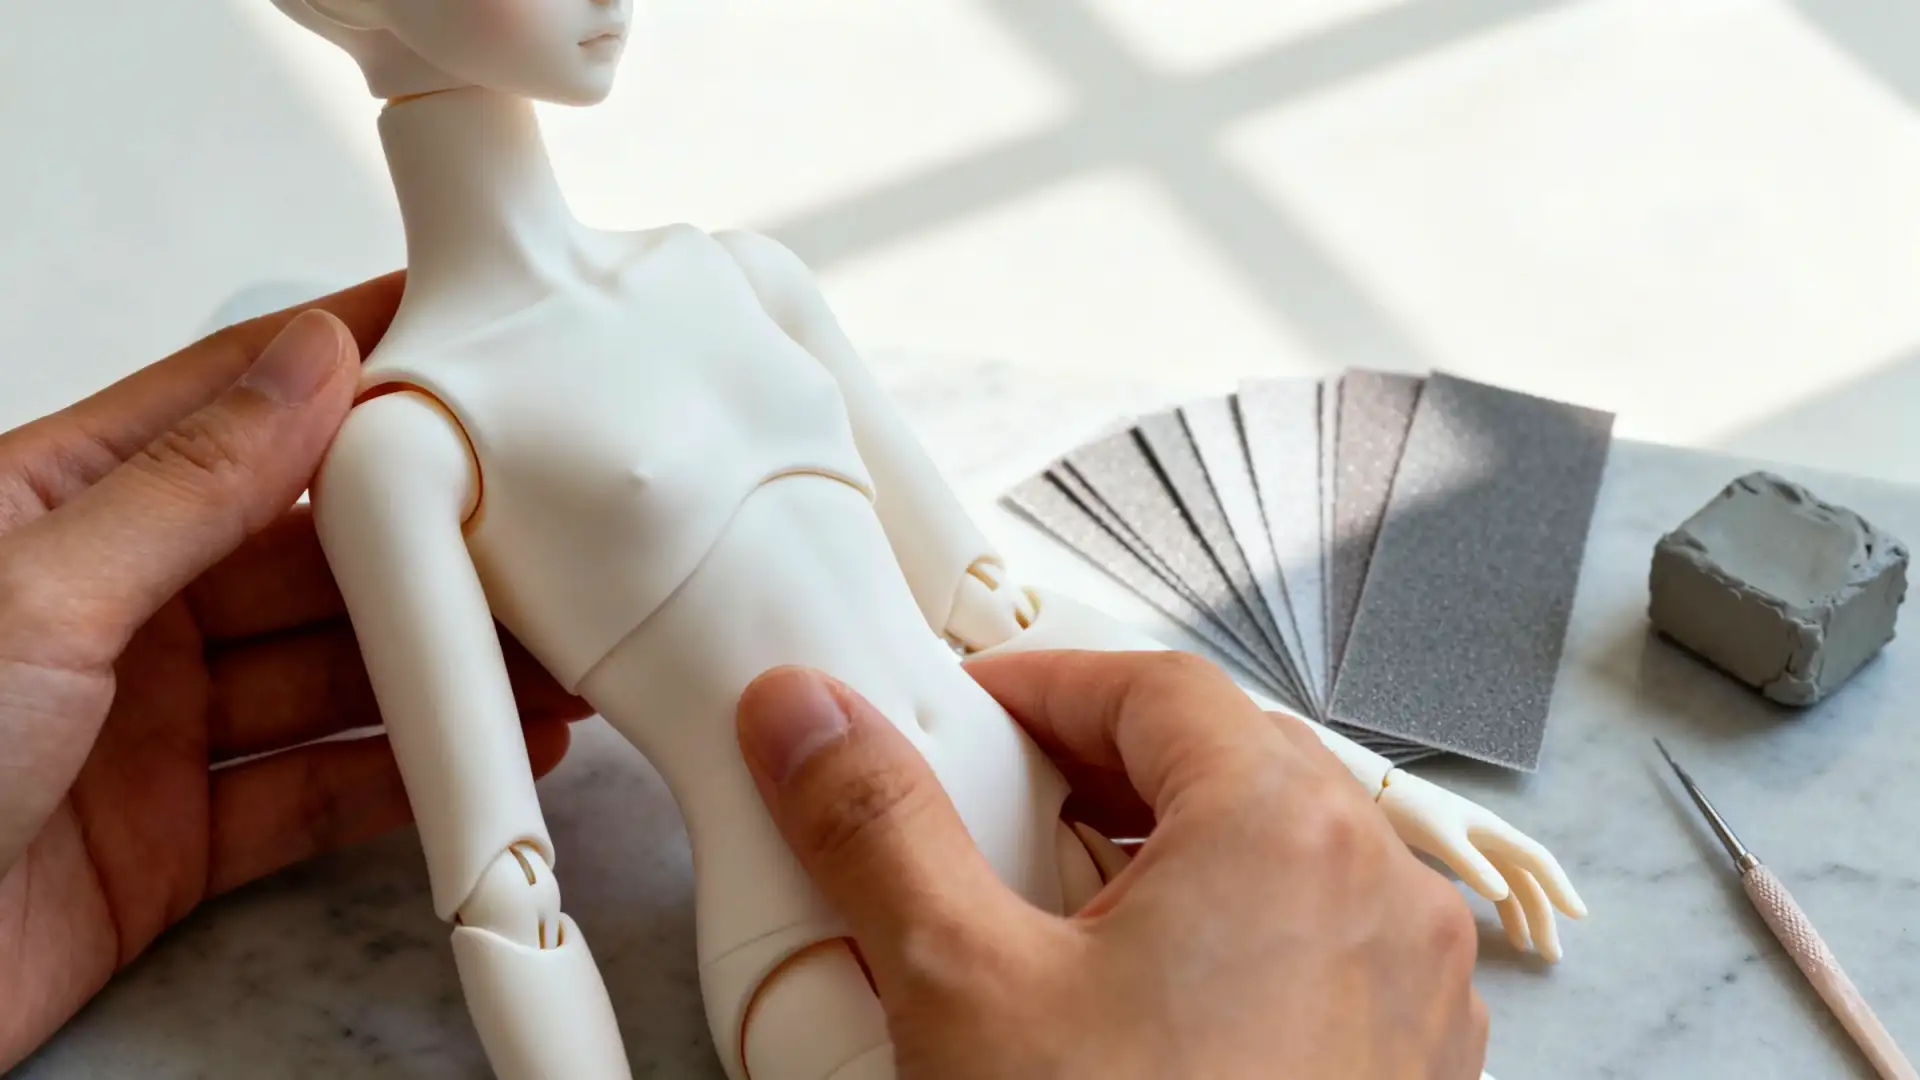
Welcome, fellow doll enthusiasts, to a journey that transcends mere ownership and delves into the heart of creation. After 15 years immersed in the intricate world of BJD collecting, customizing, and modifying, I’ve come to understand that a doll is more than just a beautiful object; it’s a canvas, a character waiting to be fully realized. Today, we’re going to talk about BJD body modification – the advanced art of physically altering a doll’s resin form to achieve a truly personalized physique. This isn’t just about owning a doll; it’s about breathing unique life into it, transforming a mass-produced figure into an unparalleled, one-of-a-kind being. It’s a challenging yet incredibly rewarding path, and I’m here to guide you through it, sharing the wisdom (and a few hard-learned lessons) from my own studio.
Why Modify? Beyond the Default Silhouette
I remember my very first BJD, a beautiful sculpt, but her shoulders always felt just a touch too narrow for the powerful character I envisioned. That subtle dissatisfaction was my first step into the world of BJD body modification. It wasn’t about rejecting the original design; it was about enhancing it, pushing the boundaries of what was possible.
The motivations for diving into this advanced craft are as diverse as the dolls themselves. For many, it’s the pursuit of a unique artistic expression, allowing us to sculpt a body that perfectly matches a character’s backstory or aesthetic. Perhaps you need a broader chest for a warrior, more defined musculature for an athlete, or a softer, more feminine curve for a delicate muse. Others modify to better adapt their doll to specific clothing styles, ensuring a perfect drape or fit that off-the-rack bodies might not provide. Sometimes, it’s about repairing minor joint wear or, more ambitiously, improving articulation to achieve dynamic poses. Ultimately, it’s about chasing a personal aesthetic, a vision of beauty that the default factory body, however lovely, simply can’t fulfill. This process is a profound act of secondary creation, building upon the original artist’s foundation with respect and a deep understanding of anatomical structure.
The Golden Rule: Safety & Preparation First (BJD body modification safety)
Before we even think about picking up a tool, let’s talk about the absolute non-negotiables. From my 15 years of experience, I can tell you that neglecting safety and preparation is the quickest way to regret your project. This isn’t just about protecting your doll; it’s about protecting you. This is the cornerstone of BJD body modification safety.
- Work Environment: Your workspace needs to be well-ventilated, brightly lit, and meticulously clean. Resin dust is no joke. If you don’t have a dedicated workshop, open windows, use a fan to direct dust away from you, and consider an air purifier. Good lighting is crucial for seeing fine details and avoiding mistakes. A clean space prevents contamination and lost small parts.
- Personal Safety Gear: This is non-negotiable.
- Dust Mask/Respirator: You must wear a high-quality dust mask (N95 or better) or, ideally, a respirator. Resin dust, especially from sanding, is extremely fine and can be harmful if inhaled. Long-term exposure can lead to respiratory issues, allergic reactions, and other serious health problems.
- Safety Goggles/Glasses: Protect your eyes from flying resin particles.
- Gloves: Nitrile gloves are excellent for protecting your hands from dust, epoxy putty, and any solvents you might use.
So, when you find yourself thinking about skipping practice and diving straight into your beloved doll, remember the potential for deep, irreparable scratches, unsightly dents, or even structural damage that could render your doll scrap or drastically reduce its value. And when that dust mask feels cumbersome, or you’re tempted to skip proper ventilation, think about the long-term risks: inhaling resin dust can lead to respiratory illnesses, severe allergies, and other serious health issues. These aren’t just rules to protect the resin; they are the ultimate safeguards for your health, your invested time and effort, and the intrinsic value of your doll. Trust me, a few minutes of diligent preparation can save you months of heartache or worse.
- Tool Sterilization: Before starting, ensure all your tools are clean. Oils from your hands or residual grime can transfer to the resin, affecting adhesion or finish. A quick wipe down with rubbing alcohol is usually sufficient.
- Psychological Preparation: This is perhaps the most overlooked aspect. BJD body modification requires patience, precision, and a willingness to learn from mistakes. Don’t expect perfection on your first try. Start with small, reversible changes or practice on scrap resin pieces. Understand that you will make mistakes, and that’s part of the learning process. Embrace the journey, not just the destination.
Your Arsenal: Essential Tools for Body Sculpting (BJD body modification tools)
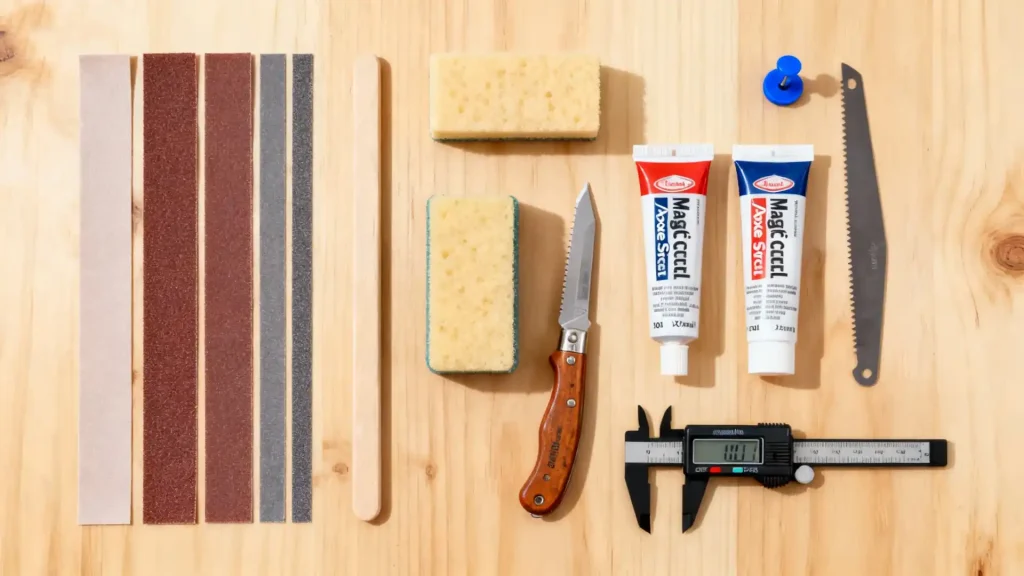
Just like any skilled artisan, a BJD modifier needs the right tools. It’s not just about having them; it’s about understanding why each tool is essential and how to use it effectively. Here’s a breakdown of your essential BJD body modification tools:
- Sanding Series: This is your bread and butter for shaping and smoothing.
- Sandpaper: You’ll need a range of grits, from low (e.g., 220-400 for aggressive shaping) to high (e.g., 800-2000+ for fine finishing). The “grit” number indicates the coarseness; lower numbers are coarser, higher numbers are finer.
- Sanding Sticks/Files: These are invaluable for reaching tight spots, defining edges, and providing a firm backing for sandpaper.
- Sponge Sandpaper/Sanding Sponges: Perfect for conforming to curves and preventing flat spots on rounded surfaces.
- Cutting & Carving: Use these with extreme caution and precision.
- Hobby Saw/Jeweler’s Saw: For making precise cuts, like separating limbs or removing larger sections of resin. Always go slow and steady.
- Hobby Knives/X-Acto Knives: Excellent for detailed carving, trimming excess material, or refining small areas. Always use a fresh, sharp blade and cut away from yourself.
- Filling & Sculpting: This is where you add material and shape new forms.
- Epoxy Putty (e.g., Magic Sculpt, Apoxie Sculpt): This is the “gold standard” for BJD body modification epoxy putty. Why? Because once cured, it’s incredibly strong, can be sanded, drilled, and painted just like resin. It’s a two-part clay that mixes easily, has a good working time, and cures rock-hard. It’s superior to air-dry clays or other fillers that might not bond as well or have the same durability.
- Auxiliary Tools:
- Blu Tack/Poster Putty: Fantastic for temporarily holding pieces, simulating changes, or masking areas.
- Masking Tape: For protecting areas you don’t want to modify or for creating clean lines.
- Calipers: Essential for precise measurements, ensuring symmetry and accurate proportions.
- Pencils/Fine-Tip Markers: For marking cut lines, sculpting guides, and planning your modifications.
- Dremel/Rotary Tool (Optional, with caution): Can speed up material removal, but requires a very steady hand and low speeds to avoid melting resin or making irreversible mistakes. Always practice on scrap first.
Core Techniques: A Step-by-Step Walkthrough (BJD body sculpting tutorial, how to modify BJD body)
Now, let’s get into the nitty-gritty of how to modify BJD body and the actual BJD body sculpting tutorial. This section will guide you through the fundamental steps, emphasizing precision and patience.
1. Planning and Marking
This is arguably the most critical stage. A well-planned modification is half done.
- Visualize: Have a clear vision of the desired outcome. Use reference images of human anatomy or other dolls if needed.
- Measure: Use your calipers to take precise measurements of the original body and compare them to your desired dimensions. This helps maintain symmetry and proportion.
- Simulate: For adding material, use Blu Tack or modeling clay to temporarily build up areas. This allows you to visualize the change before committing. For material removal, you can use a marker to outline the areas to be reduced.
- Mark: Once you’re satisfied with your plan, use a fine-tip pencil or marker to precisely draw your cut lines, sanding guides, or sculpting boundaries directly onto the resin. Double-check everything.
2. Material Removal: Sanding and Cutting (BJD resin sanding guide)
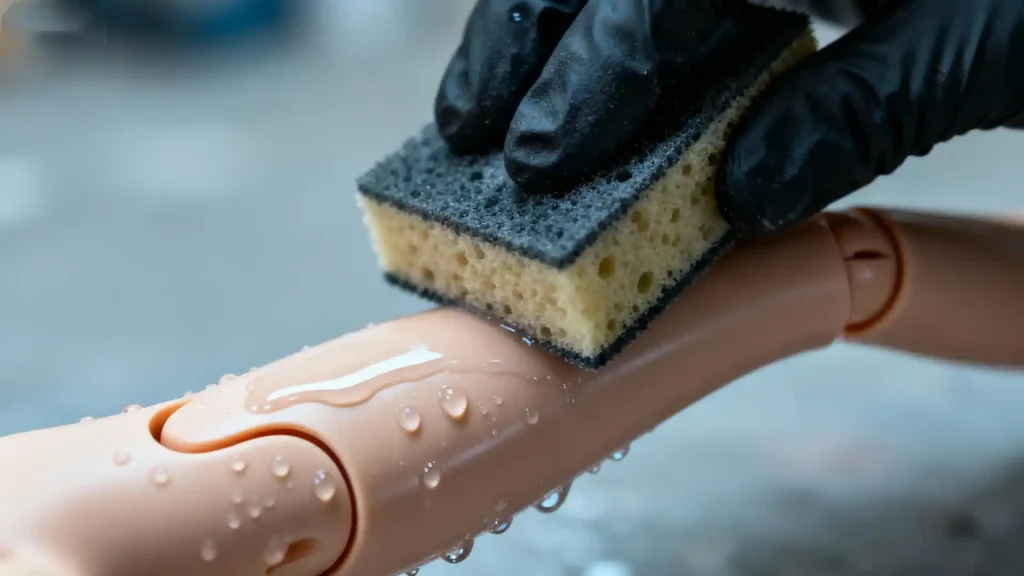
This is where you start shaping by taking away material. This is your BJD resin sanding guide.
- Cutting (if necessary): If you need to remove a significant chunk of resin (e.g., shortening a limb, removing a large protrusion), use your hobby saw.
- Secure the piece: Hold the resin firmly or clamp it gently to prevent slipping.
- Slow and steady: Make small, controlled strokes. Don’t force the saw.
- Clean cuts: Aim for as clean a cut as possible to minimize subsequent sanding.
- Sanding: This is where the magic of shaping happens.
- Start low, go high: Always begin with a lower grit sandpaper (e.g., 220-400) for aggressive material removal and shaping. As you get closer to your desired form, progressively move to higher grits (600, 800, 1000, 1500, 2000+) to smooth out scratches and achieve a polished surface.
- Even pressure: Apply consistent, even pressure. Uneven pressure can create dips or flat spots.
- Follow contours: When sanding curves, use sponge sandpapers or wrap sandpaper around a soft object to maintain the natural curvature.
- Dry vs. Wet Sanding:
- Dry Sanding: Faster material removal, easier to see progress, but creates more dust. Always use your mask!
- Wet Sanding: Reduces dust, provides a smoother finish, and extends sandpaper life. Dip your sandpaper in water frequently. The downside is it’s harder to see the exact shape you’re creating until it dries. I often start dry for rough shaping and switch to wet sanding for the finer grits.
- Check frequently: Stop often, wipe away dust, and inspect your work from all angles. Use your fingers to feel for imperfections.
3. Material Addition: Building with Epoxy Putty (BJD body shaping techniques)
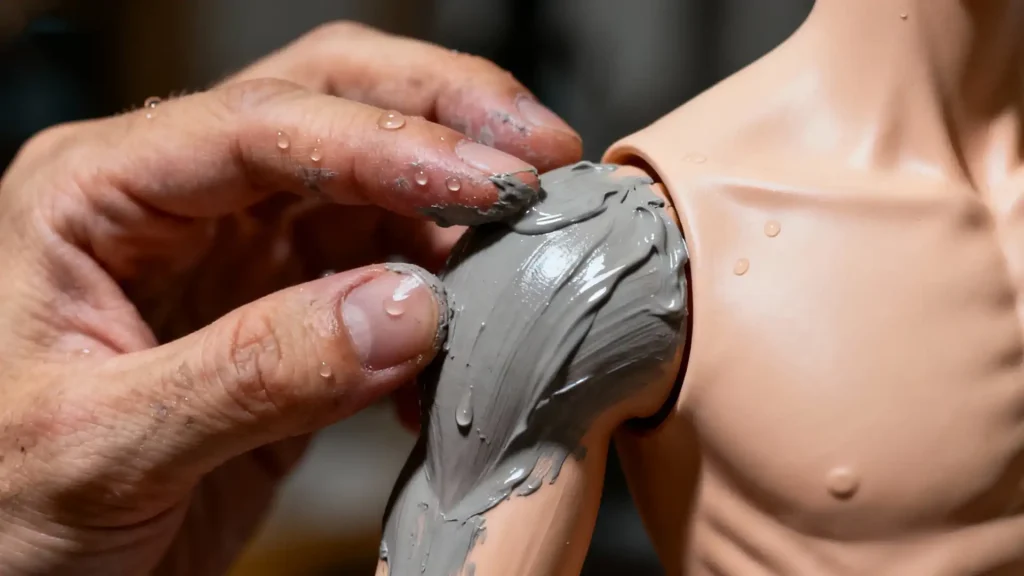
This is where you sculpt new forms and add volume, utilizing advanced BJD body shaping techniques.
- Mixing the Putty: Follow the manufacturer’s instructions precisely. Most epoxy putties are a 1:1 ratio of two parts. Mix thoroughly until a uniform color is achieved, usually for 2-3 minutes. Incomplete mixing will result in soft spots that won’t cure properly.
- Applying in Layers: Don’t try to build up a large area in one go. Apply the putty in thin, even layers. This prevents air bubbles from getting trapped inside, which can lead to weak spots or unsightly voids when you sand.
- Shaping:
- Rough Shape: Use sculpting tools or even your gloved fingers to roughly shape the putty to your desired form.
- Smooth Surface: Here’s a pro tip: dip your finger in water and gently smooth the surface of the putty before it cures. The water acts as a lubricant, allowing you to achieve incredibly smooth transitions and muscle lines without much effort. This significantly reduces the amount of sanding needed later.
- Working Time: Be mindful of the putty’s working time (usually 1-3 hours). Don’t rush, but don’t dawdle too much either.
- Curing: Allow the putty to cure completely, typically 12-24 hours, before attempting to sand or further manipulate it. Rushing this step will lead to crumbling or damage.
4. Refinement and Blending
This is where your patience truly pays off, ensuring a seamless integration of new and old.
- Initial Sanding: Once the putty is fully cured, start sanding it down, again moving from lower to higher grits. Focus on blending the new material seamlessly into the original resin. You want to eliminate any visible seams or abrupt transitions.
- Feathering: Use a technique called “feathering” where you gradually reduce pressure as you sand towards the edge of the added material. This helps create a smooth, invisible blend.
- Feel, Don’t Just See: Close your eyes and run your fingers over the modified area. Your fingertips can often detect imperfections that your eyes might miss.
- Patience is Key: This stage can be tedious, but it’s crucial for a professional finish. Don’t rush. Take breaks if you feel frustrated. Remember, patience is the only shortcut to a truly flawless blend.
H3: How-To: Salvage a Sanding Mistake in 5 Steps
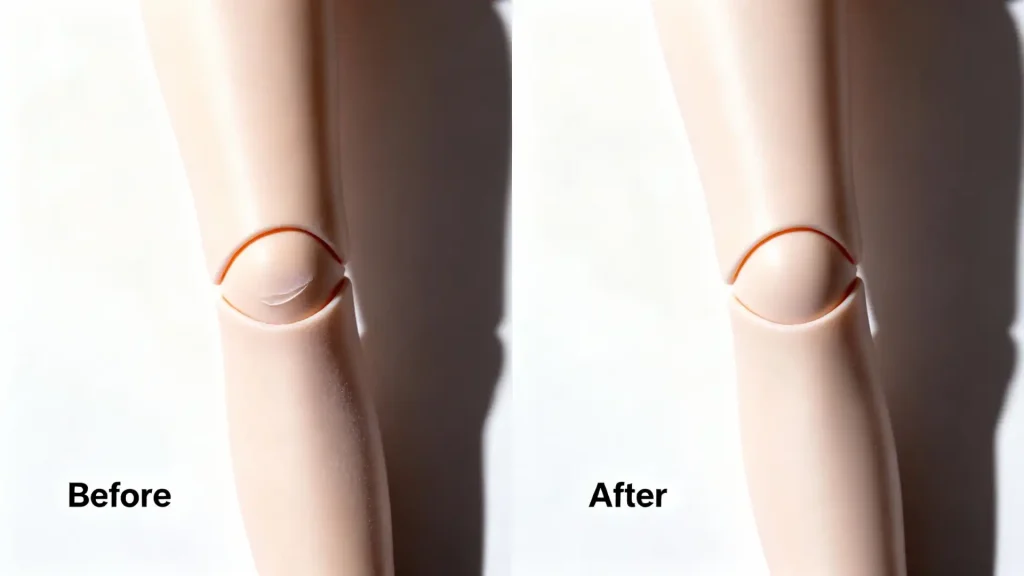
Even the most experienced modifiers make mistakes. If you’ve over-sanded or created an unwanted divot, don’t panic! Here’s a structured approach to fixing common sanding errors.
- Stay Calm and Assess the Damage:
- First, take a deep breath. Clean the affected area thoroughly with a soft brush and then rubbing alcohol to remove all dust and oils.
- Determine the nature of the mistake: Is it an “over-sanded” area (a depression or hollow where too much material was removed)? Or an “accidental gouge” (a deep scratch in the wrong place)?
- Assess the depth: Shallow scratches can often be sanded out, but deeper depressions or material loss will require filling.
- Prepare the Surface for Adhesion:
- For depressions or areas where material needs to be added, the surface must be clean and slightly textured for the new material to bond effectively.
- If the depression is deep, use a sharp hobby knife or a fine-tipped carving tool to gently cross-hatch or score the inside of the hollow. This creates microscopic anchor points for the epoxy putty.
- Clean again with alcohol to ensure no dust from scoring remains.
- Apply Micro-Fill with Epoxy Putty:
- Mix a very small amount of your chosen epoxy putty (e.g., Magic Sculpt). Remember, you can always add more, but removing excess is harder.
- Carefully press the mixed putty into the prepared depression or gouge. Use a sculpting tool or a gloved fingertip to ensure it fills the entire void, pushing out any trapped air.
- Key Technique: It’s better to slightly overfill the area, creating a small mound, rather than underfilling. This gives you material to work with during the shaping and sanding stages.
- Rough Shape and Allow to Cure:
- Using a water-dipped sculpting tool or your wet fingertip, gently rough-shape the applied putty to approximate the original contour. Aim for it to be slightly proud of the surrounding surface.
- Allow the epoxy putty to cure completely according to the manufacturer’s instructions (typically 12-24 hours). Do NOT rush this step; attempting to sand uncured putty will only create a mess.
- Patiently Refine and Blend:
- Once fully cured, begin sanding the filled area. Start with a medium-fine grit (e.g., 400-600) to carefully bring down the excess material.
- Progressively move to finer grits (800, 1000, 1500, 2000+) to smooth the surface and blend it seamlessly with the surrounding original resin.
- Regularly wipe away dust and feel the surface with your fingertips to check for smoothness and evenness. The goal is an invisible repair.Mastering this kind of repair not only fixes mistakes but builds the confidence to venture beyond basic modifications, into the realm of true customization…
Beyond Basic Mods: Exploring Custom BJD Body Parts
Once you’ve mastered the fundamentals of BJD body modification, a whole new world of possibilities opens up, especially when exploring custom BJD body parts. This is where you can truly push the boundaries of uniqueness.
- Joint Modification: A common advanced mod is widening joint sockets or reshaping joint balls to achieve greater articulation. This can dramatically improve a doll’s posing capabilities, allowing for more dynamic and lifelike stances. This requires careful planning and precise material removal to avoid weakening the joint.
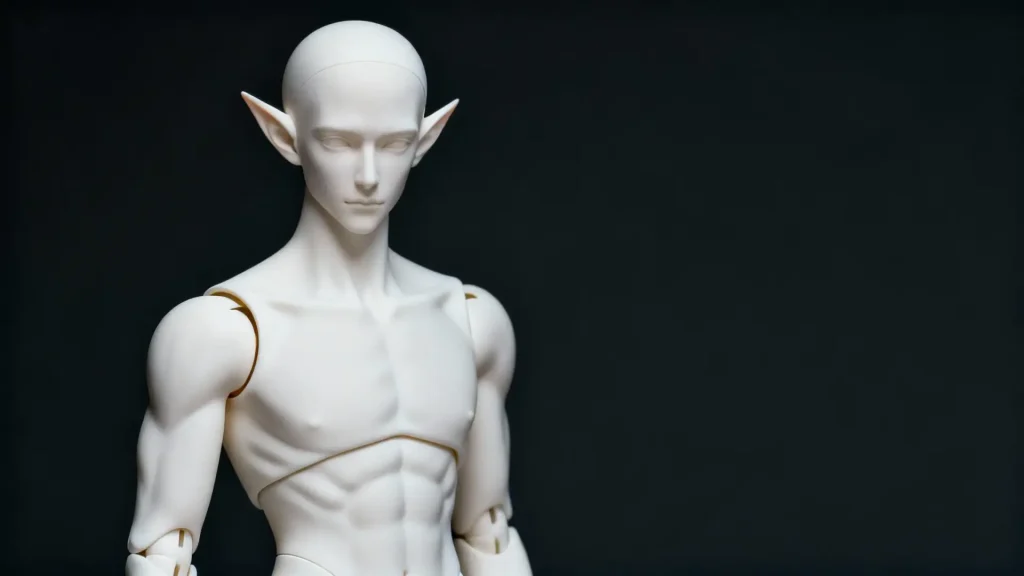
- Special Structures: Want to give your doll elven ears, a tail attachment point, or even unique limb structures? Epoxy putty is your friend here. You can sculpt these elements directly onto the body or create separate pieces that can be attached.
- Working with Artists: For truly intricate or complex custom BJD body parts like entirely new hands, feet, or a unique chest sculpt, you might consider commissioning professional BJD body modification artists. Many talented sculptors specialize in creating bespoke parts that can elevate your doll to an entirely new level. This is an excellent option if your own sculpting skills aren’t quite there yet or if you’re short on time.
Aftercare: Sealing, Painting, and Maintenance
Your BJD body modification journey doesn’t end when the sanding dust settles. Proper aftercare ensures the longevity and beauty of your newly sculpted doll.
- Cleaning: Thoroughly clean the entire doll to remove all traces of resin dust. Use a soft brush, compressed air, and then wipe down with a damp cloth or rubbing alcohol. Any remaining dust will show under sealant or paint.
- Sealing: Apply a high-quality matte or semi-gloss sealant (like MSC, Mr. Super Clear UV Cut) to protect the resin and any newly sculpted areas. This creates an even finish and provides a protective layer. Always spray in a well-ventilated area, following the product’s instructions.
- Color Matching/Painting: If your modification involved adding putty, you’ll likely need to color-match it to the original resin. This is a delicate process.
- Professional Help: For a perfect match, consider sending your doll to a professional face-up artist who also offers body blushing services. They have the expertise and tools to blend colors seamlessly.
- DIY: If you’re brave, you can use model paints (like those from Gunze or Tamiya) mixed with a matte medium. Always test your color mix on a scrap piece of resin or a hidden area first. Build up thin layers to avoid a patchy look.
- Maintenance: After modification, handle your doll with care. Be mindful of the newly sculpted areas, especially if they are delicate. Regular cleaning and occasional re-sealing will keep your doll looking its best.
Frequently Asked Questions (FAQ)
Over the years, I’ve heard countless questions from fellow enthusiasts. Here are some of the most common ones regarding BJD body modification:
- “What paint should I use to match the original body color?”
Achieving a perfect match is incredibly challenging. Your best bet is to send the doll to a professional artist who specializes in body blushing and color matching. If you’re doing it yourself, model paints (like acrylics or lacquers from brands like Gunze Sangyo or Tamiya) are often used. You’ll need to mix custom colors and apply them in very thin, translucent layers, often with an airbrush, to blend seamlessly. Always test on a hidden area first. - “Will modifying my doll affect its resale value?”
Objectively, yes, it usually will. Most collectors prefer original, unmodified dolls. However, there are exceptions. If your BJD body modification is exceptionally well-executed, enhances the doll’s aesthetics significantly, or transforms it into a unique art piece with a strong artistic vision, it might retain or even increase its value to a niche buyer. But generally, assume a modified doll will have a lower resale value. My advice? Modify for your own enjoyment and artistic expression, not for future profit. Create for your passion. - “What’s the approximate BJD body modification cost?”
The BJD body modification cost can vary widely.- DIY: Tools (sandpaper, files, putty, masks, etc.) can range from 50 to 200+ depending on the quality and quantity you buy. If you already have some hobby tools, it will be less.
- Commissioning an Artist: This is significantly more expensive, ranging from a few hundred dollars for minor modifications to well over a thousand for extensive sculpting or custom parts. This cost reflects the artist’s skill, time, and materials.
- “Are there differences in modifying different resin types (e.g., normal, white, tan)?”
Yes, there can be subtle differences. Different resin colors and manufacturers can have slightly different hardnesses, which affects how they sand. White resin might show imperfections more readily, while tan resin can be harder to color-match if you’re painting. Always test your tools and techniques on a hidden area or scrap piece of the specific resin type you’re working with. - “Where can I see successful BJD body modification before and after examples?”
The BJD community is a treasure trove! Search online forums, Instagram, Flickr, and Pinterest for terms like “BJD body modification before and after,” “BJD custom body,” or “BJD sculpting.” You’ll find incredible examples of transformations and gain inspiration for your own projects.
And there you have it, my friends – a comprehensive dive into the world of BJD body modification. It’s a journey that demands skill, patience, and a deep love for your dolls, but the rewards are immeasurable. It’s about transforming a mass-produced item into a unique extension of your artistic vision, a true one-of-a-kind creation. Don’t be intimidated; start small, practice on scrap pieces, and most importantly, enjoy the process. This is your doll, your art, and your story. I encourage you to take that first step towards complete creative freedom. Share your work, learn from others, and continue to sculpt your doll’s unique form. The joy of seeing your vision come to life is truly unparalleled. Happy sculpting!
BJD Customization & Maintenance Series
- Your 2025 BJD Faceup Tutorial: A Pro’s Guide to Soulful Art
- How to String a BJD: A Veteran’s No-Nonsense Guide
- Pristine Resin: How to Clean a BJD Doll The Right Way
- BJD Customization: The Ultimate Guide to Personalizing Your Doll
- BJD Body Blushing: The Alchemist’s Guide to Skin That Breathes
- Make BJD Doll Eyes: An Alchemist’s Guide to Painting Soulful Gaze
- BJD Wig Styling Mastery: The Ultimate Care, Cutting & Customization Guide
- The Ultimate BJD Clothing Guide: Design, Patterns & Fit
- Ultimate BJD Storage Guide: Beat Yellowing with Pro Display Ideas
- BJD Faceup Pricing Guide: Unpacking Custom Eye Chips & Lip Blushing Costs
- Bringing Them Back to Life: Your Guide to BJD Restoration Service for Broken Fingers & Yellowed Resin
- BJD Stringing Kits: DIY Tightening for Stable, Pro Posing
- BJD Customization Services: Faceup & Full Body Blushing Guide
- BJD Body Modification: Sculpting Your Doll‘s Unique Form (2025 Guide) (You are here)
- Mastering BJD Seam Sanding: A Pro’s Guide to Flawless Resin Finishes
- BJD Joint Maintenance: Keeping Your Doll Posing Perfectly for Years
- BJD Eye Well Modification: Achieving Deeper, More Expressive Gaze
- Mastering Advanced BJD Faceups: Beyond Basics to Lifelike Artistry
- BJD Resin Whitening & Anti-Yellowing: A Collector’s Proven Guide to Preserve Beauty
- BJD Stringing Tension Guide: Optimizing Posing & Stability
- BJD Magnet Installation: The Ultimate Safety Guide to Unlocking Dynamic Posing