After 15 years of collecting, customizing, and painting BJD face-ups, I’ve come to a profound realization: achieving a truly flawless resin finish isn’t about having the most expensive tools. It’s about understanding the unique properties of resin, diligently following a progressive coarse-to-fine sanding process, and cultivating the patience to “feel with your hands, not just see with your eyes.” This guide isn’t just a list of steps; it’s a distillation of countless hours spent at my workbench, learning from every success and, more importantly, every mistake. I’m here to share the hard-won wisdom that will transform your BJD seam sanding experience, helping you overcome common frustrations and achieve the smooth, seamless doll you envision as part of your complete BJD customization journey
Quick-Start How-To: Your 5-Step BJD Seam Sanding Cheat Sheet
- Assess & Mark: Carefully examine your doll. Use a white water-soluble pencil to trace all visible seam lines.
- Remove: Begin with 400-grit wet sandpaper. Sand in one direction, parallel to the seam, until the pencil line disappears and the raised ridge is gone. Keep it wet!
- Refine: Progress through finer grits: 600 -> 800 -> 1000 -> 1500 -> 2000 (or higher). Thoroughly clean the doll and your hands between each grit to avoid new scratches.
- Inspect: Perform the “nail test” (run your fingernail lightly across the surface) and check under strong raking light. If you feel or see any imperfections, go back a step.
- Polish (Optional): For a mirror-like sheen, use a plastic polishing compound or Micro-Mesh pads after 2000-grit.
Why Seam Sanding is Your Make-or-Break Step
When I first started, I admit, I saw seam sanding as a chore, a necessary evil before the fun part of face-ups and costuming. But over the years, I’ve learned that it’s the foundational step that truly elevates a BJD from a factory-produced item to a personalized work of art. It’s where the magic of transformation truly begins.
The Reality of BJD Casting Seams
Let’s be honest, BJD resin casting is an art form in itself, but it’s not perfect. Every BJD, whether it’s a pristine White Skin (WS) or a vibrant Dollfie Dream resin, comes out of a mold. These molds are typically two-part, and where those two halves meet, you’ll inevitably find a seam line – a slight ridge or flash of excess resin. This is a natural byproduct of the manufacturing process, a testament to how your doll was born. Understanding these BJD casting flaws repair needs is the first step to accepting and addressing them. It’s not a defect in your doll, but rather an opportunity for you to refine it.
More Than Aesthetics: The Functional Impact
Ignoring those seam lines might seem like a shortcut, but trust me, it’s a decision you’ll regret. Beyond the obvious visual distraction, untreated seams have a significant functional impact. They can snag clothing, making dressing your doll a frustrating experience. More critically, for those of us who love to do BJD preparation for faceup, prominent seams can disrupt the smooth canvas, creating shadows and uneven surfaces that make painting a nightmare. Imagine trying to draw a perfect eyebrow over a bumpy ridge – it just won’t work. The way light catches these imperfections can also drastically alter the doll’s appearance, making it look less refined—something that becomes especially important when you’re preparing for detailed work like creating a soulful facial expression. A smooth surface allows light to play beautifully, enhancing the doll’s sculpt and making your face-up truly shine.
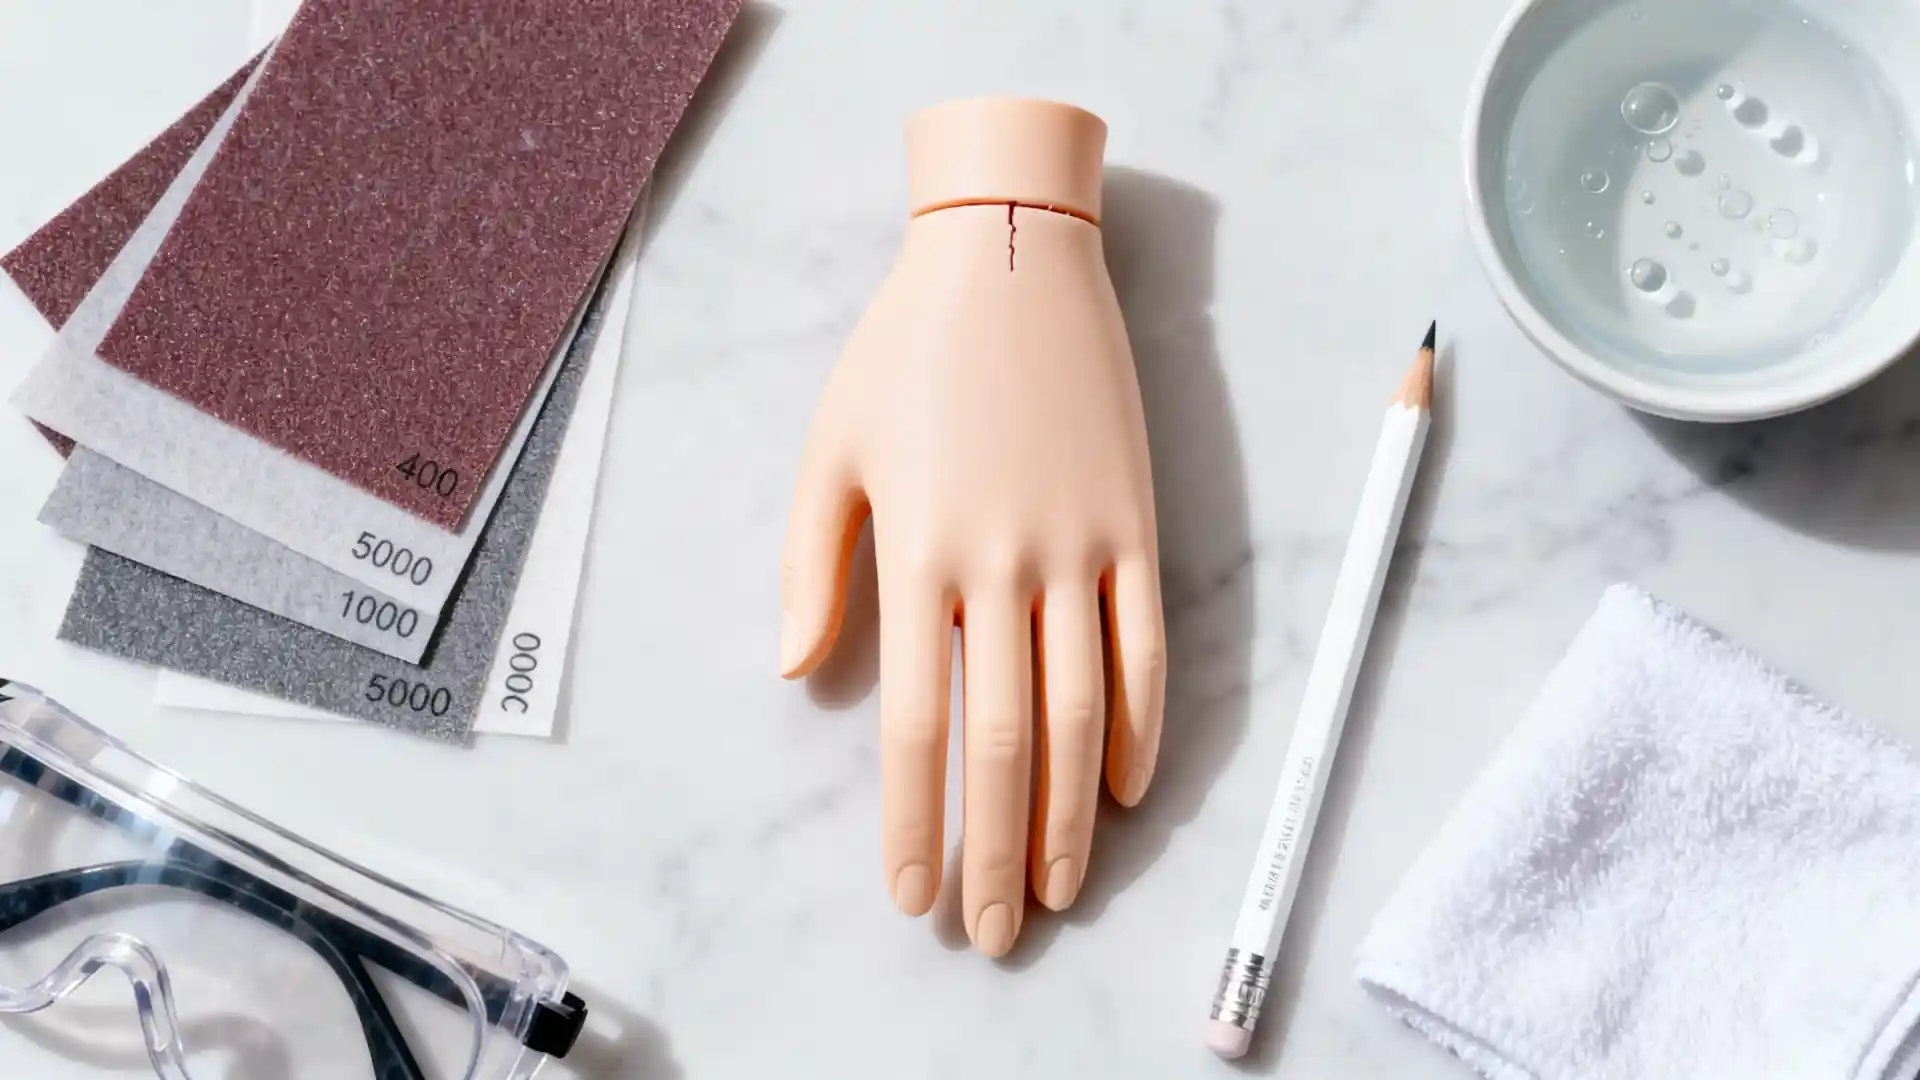
Building Your Arsenal: A Curated Tool Guide
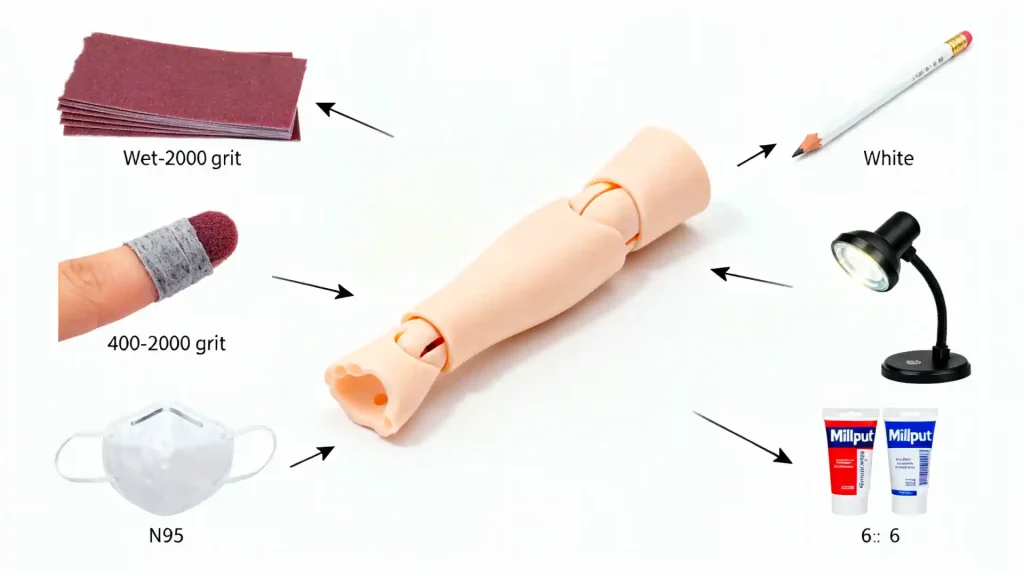
My workbench has seen many tools come and go over the years, but a select few have earned their permanent spot. This isn’t about buying everything; it’s about having the right tools for the job, chosen for their effectiveness and reliability. When it comes to BJD seam removal tools, quality and suitability are key.
Essential Core Tools
For best sandpaper for BJD, I’ve found that a good range of wet/dry sandpaper is non-negotiable. I typically start with 400 grit for initial removal, then progressively move to 600, 800, 1000, 1500, and finally 2000 grit. Sometimes, for a truly mirror-like finish, I’ll even go up to 3000 or 4000 grit. My go-to brands are usually 3M or Tamiya, as their grits are consistent. However, don’t shy away from automotive wet/dry sandpaper found at your local hardware store; brands like Norton or Gator are often excellent and more readily available.
My Trick: Always buy wet/dry sandpaper. Using it wet significantly reduces dust, prevents clogging, and gives a smoother finish. Plus, it extends the life of your sandpaper!
Sanding sticks or sanding sponges are also invaluable. They provide a firm, flat surface for sanding larger areas and help maintain the doll’s original contours. For intricate areas, I often cut small pieces of sandpaper and wrap them around a craft stick or even a toothpick. The soft, flexible nature of sponge sanders (often found in hobby stores) is fantastic for curved surfaces, allowing you to apply even pressure without creating flat spots.
Advanced & Optional Tools
Now, about power tools. I’ve been there, tempted by the promise of speed. Early in my journey, I invested in a Dremel-style rotary tool, thinking it would revolutionize my BJD sanding techniques. Oh, the hubris! I still remember the day I accidentally gouged a deep furrow into a brand new doll’s thigh. The resin heated up so fast it practically melted, leaving an irreversible scar. It was a painful, expensive lesson.
My Hard-Learned Lesson: Power tools, like Dremels, are extremely risky for BJD seam sanding unless you are highly experienced and use them with extreme caution, very low speeds, and fine attachments. They generate heat quickly and remove material aggressively. For beginners, I strongly advise against them. Stick to manual sanding; it’s slower but far safer. If you must use one, practice on scrap resin first, use a very light touch, and keep the tool moving constantly to prevent heat buildup.
For advanced polishing, beyond traditional sandpaper, I’ve had great success with Micro-Mesh polishing kits. These come in a wide range of ultra-fine grits (up to 12000!) and are fantastic for achieving a high-gloss finish. Similarly, automotive polishing compounds like Meguiar’s PlastX or even fine jeweler’s rouge can be excellent for that final, mirror-like shine.
Safety & Auxiliary Gear
Your health and the doll’s integrity are paramount. Dust masks are non-negotiable. Resin dust is fine and can be harmful if inhaled. I always wear a good quality N95 mask. Good lighting is also crucial. I use a bright, adjustable LED desk lamp, often paired with a magnifying lamp. This combination allows me to spot even the tiniest imperfections and ensure I’m not over-sanding. A soft cloth or microfiber towel for wiping away dust and water,Keeping your doll clean during and after sanding is crucial, and using proper BJD cleaning methods ensures no residue interferes with your work and a small bowl of water for wet sanding, complete my basic setup.
The Step-by-Step Sanding Process: From Raised Line to Flawless Finish
This is where the rubber meets the road, or rather, where the sandpaper meets the resin. This section is packed with the BJD resin sanding tips I’ve gathered over years of trial and error. Remember, patience is your best friend here.
Stage 1: Assessment and Marking
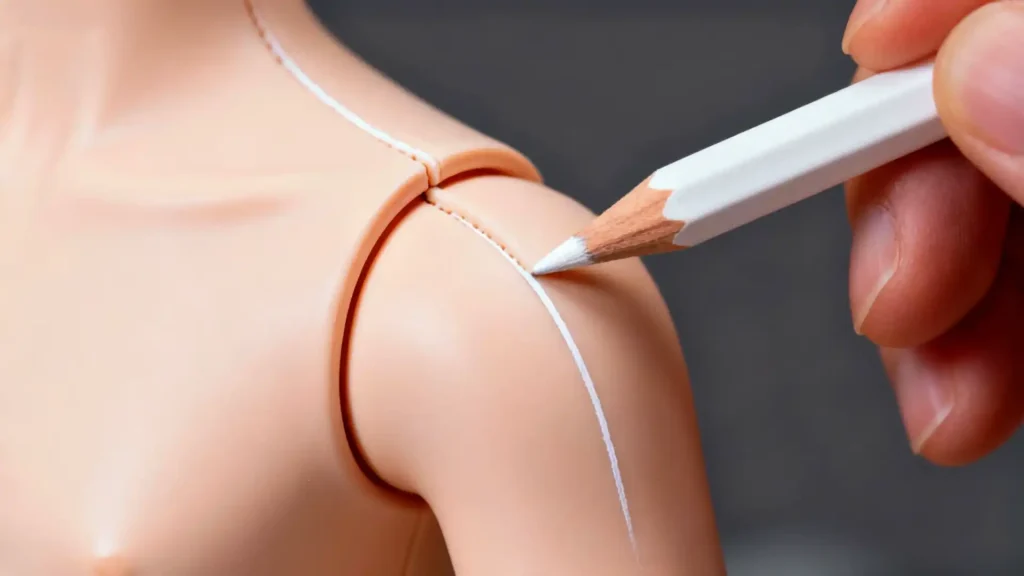
Before you even pick up sandpaper, take a moment to truly see your doll. Examine every limb, torso, and head piece under good light. Run your fingers along the edges. Where are the seams? How prominent are they? Are there any deep pits or casting imperfections that need special attention? This initial assessment is crucial for planning your attack.
My Unique Marking Method: I’ve found that using a white water-soluble pencil (like those used for fabric marking) is a game-changer. I lightly trace along the seam lines. As I sand, the white line disappears, giving me a clear visual indicator of where I’ve worked and how much material I’ve removed. It’s easily wiped away with a damp cloth and doesn’t stain the resin. This prevents over-sanding in one spot and ensures even removal.
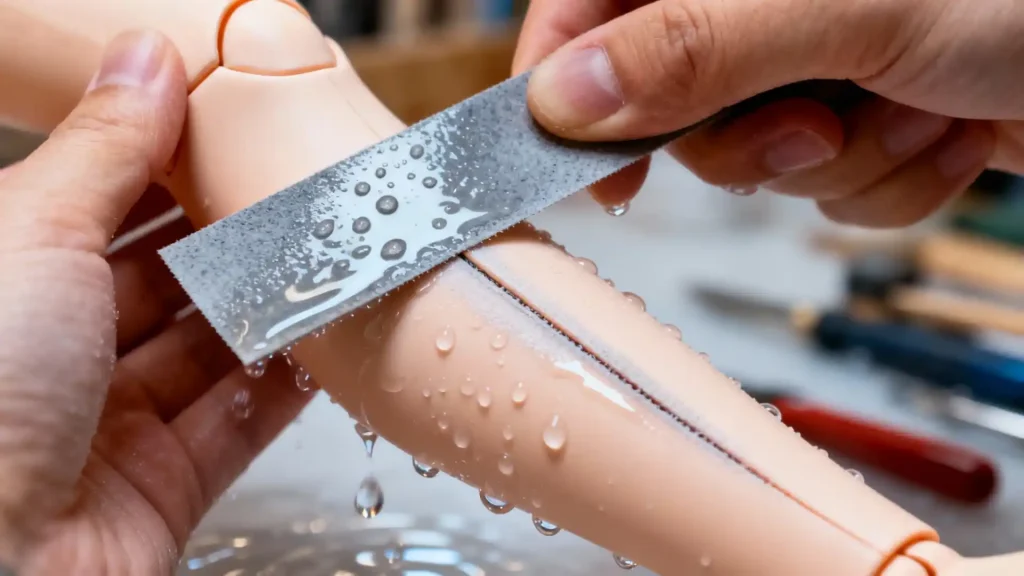
Stage 2: Aggressive Removal (How to Remove BJD Seams)
This is where we tackle the bulk of the seam. I start with 400-grit wet/dry sandpaper. The goal here is to remove the raised seam line without altering the surrounding sculpt.
- Technique: Always sand in one direction, parallel to the seam line, using long, even strokes. Avoid circular motions, as these can create swirl marks or flat spots.
- Pressure: Apply firm but controlled pressure. Let the sandpaper do the work.
- Wet Sanding: Keep the sandpaper and the resin surface wet. Dip your sandpaper in water frequently. This lubricates the surface, carries away resin dust, and helps you see your progress more clearly.
- Check Frequently: Stop often, wipe the area clean, and inspect your progress. Run your finger over the seam. Is the ridge gone? If not, continue with the 400-grit. The white pencil line will be your guide.
Stage 3: Progressive Refinement (BJD Sanding Techniques)
Once the main seam line is gone, it’s time to refine the surface. This is the heart of achieving a smooth finish. We’ll move through progressively finer grits: 600, 800, 1000, 1500, and 2000 grit.
- The Golden Rule: Thoroughly clean the resin and your hands before moving to a finer grit. Any coarser grit particles left on the doll or your hands can get picked up by the finer sandpaper and create new scratches, forcing you to go back a step. I usually rinse the piece under running water and dry it with a clean cloth.
- Technique: Continue with the same one-directional, parallel strokes. The pressure should become lighter with each finer grit.
- Purpose of Each Grit:
- 600-800 grit: This is the ‘repairman.’ Its job is to erase the obvious trenches left by the 400-grit. When you see those rough scratches turn into a uniform matte haze, you know you’ve succeeded.
- 1000-1500 grit: Now we’re getting serious about smoothness. This stage is about refining that haze, making the surface feel silky to the touch. You’re literally polishing away microscopic imperfections.
- 2000 grit: This is the ‘finisher.’ It brings out a subtle sheen, preparing the resin for its ultimate smooth state. At this point, the surface should feel incredibly smooth, almost like glass.
Stage 4: The Final Touch: Polishing to Perfection
To achieve that truly smooth BJD resin finish, especially on lighter resins like WS, you might want to go beyond 2000 grit.
- Higher Grits: If you can find them, 3000 or 4000 grit sandpaper will give an even finer polish. This is where Micro-Mesh pads truly shine, offering grits up to 12000 for an unparalleled finish.
- Polishing Compounds: For an ultimate smooth finish, I sometimes use a plastic polishing compound (like Novus Plastic Polish #2, Tamiya Polishing Compound Fine, or Meguiar’s PlastX) applied with a soft cloth. Work it in small circular motions until the desired sheen is achieved, then wipe clean. This step is particularly effective for restoring a factory-like luster.
Stage 5: The Nail Test and Visual Inspection
This is my ultimate standard for judging completion. Your eyes can deceive you, especially under direct light.
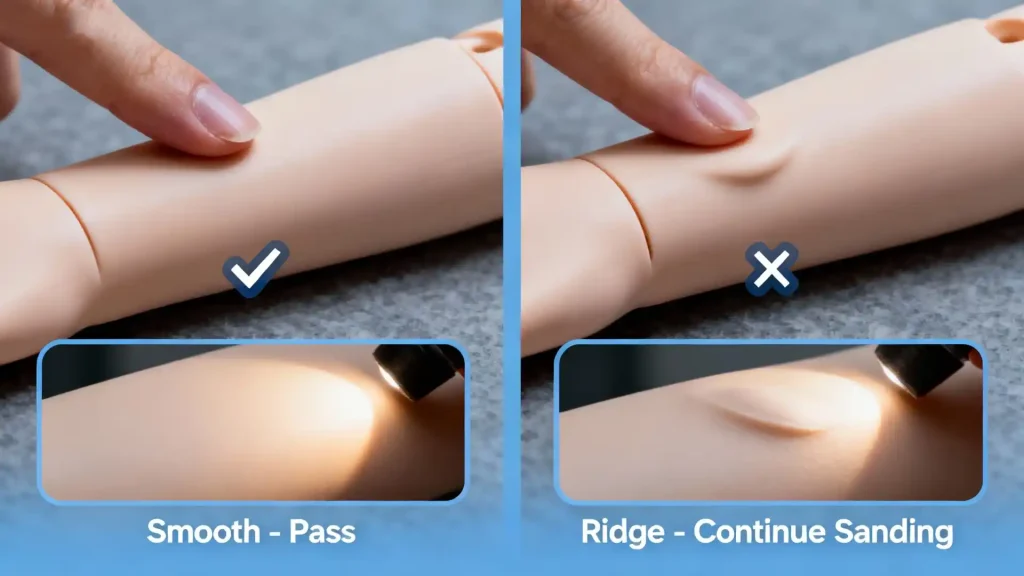
My Ultimate Test: After cleaning the piece thoroughly, close your eyes and run your fingernail very lightly across the sanded area, perpendicular to where the seam was. If you feel any ridge, bump, or unevenness, you’re not done. Your fingernail is far more sensitive than your eye. Then, hold the piece under a strong, raking light (light shining almost parallel to the surface). This will highlight any remaining imperfections, scratches, or unevenness. If it passes both the nail test and the raking light inspection, you’ve achieved a truly flawless finish.
Beyond the Basics: Repairing Mistakes and Tough Seams
Even with 15 years under my belt, I still occasionally make a mistake—something that happens in all aspects of doll care, from simple sanding to complex BJD restoration techniques. It’s part of the learning process. The key is knowing how to fix BJD seam line repair issues without panicking.
Oh No, I Sanded Too Much!
It happens. You get a little too enthusiastic with the 400-grit, and suddenly, you have a slight depression where a seam used to be. Don’t despair! This is where how to fix BJD sanding mistakes comes into play.
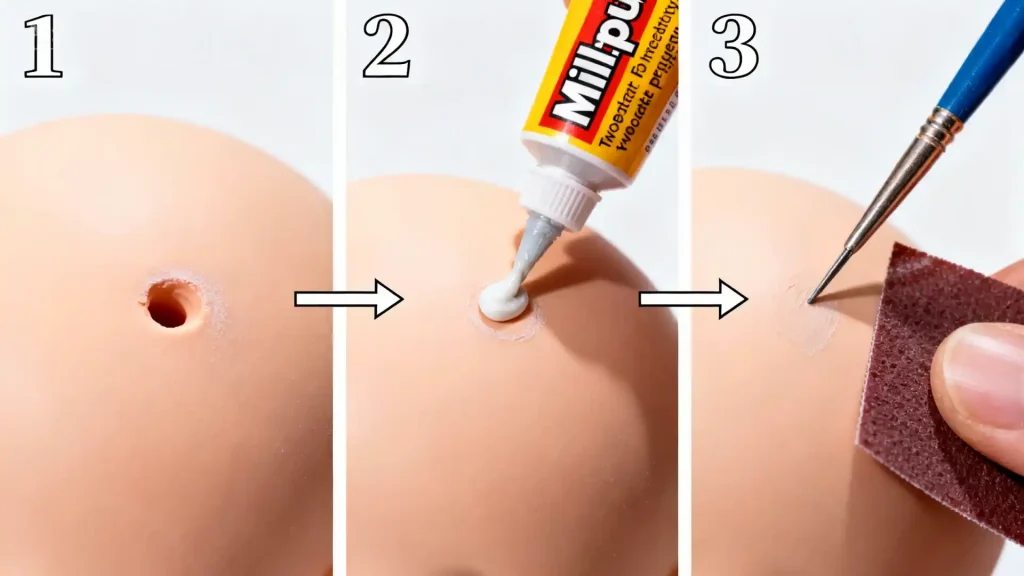
My Go-To Fix: For minor depressions, I use a two-part epoxy putty designed for plastics (like Milliput Superfine White or Tamiya Epoxy Putty). Mix a tiny amount according to the instructions, apply it carefully to the depression, and sculpt it to match the surrounding surface. Let it cure completely (usually 24 hours). Once hardened, you can sand it down just like resin, starting with a fine grit (e.g., 600) and working your way up. The key is to use a very small amount and blend it seamlessly.
Tackling the Nightmare: Deep or Pitted Seams
Sometimes, you encounter a seam that’s not just a raised line but a deep groove or a series of tiny pits. These are the real challenges.
My Approach to Tough Seams: For very deep seams or significant pitting, simply sanding might not be enough, or it might remove too much surrounding resin. In these cases, I might carefully use a sharp hobby knife (like an X-Acto blade) to gently scrape away the most prominent parts of the seam first. This is a delicate operation; you’re scraping, not cutting, and always away from yourself. After the initial scraping, I’ll then proceed with the epoxy putty method described above to fill any remaining depressions, followed by the full sanding progression. This combination allows me to address the depth without sacrificing too much original resin.
Your BJD Seam Sanding FAQ
Over the years, I’ve heard countless questions from fellow hobbyists. Here are some of the most common, answered from my personal experience.
Q: “How do I know when to stop sanding?”
A: This is the million-dollar question! My answer is always the same: trust your fingers more than your eyes. Once the “nail test” (running your fingernail across the surface) reveals no discernible ridge or unevenness, and a raking light shows a smooth, consistent surface, you’re done with that grit. Don’t chase perfection beyond what’s necessary; you’re aiming for a smooth canvas, not necessarily a mirror polish on every surface.
Q: “Can I use regular hardware store sandpaper on my BJD?”
A: While you can, I generally advise against it for the finer grits. Hardware store sandpaper, especially the cheaper varieties, often has inconsistent grit sizes. This means a “1000-grit” sheet might have larger, coarser particles mixed in, which can leave deeper scratches than intended. For best sandpaper for BJD, I stick to automotive or hobby-grade wet/dry sandpaper (like 3M or Tamiya) because their grit consistency is much higher, leading to a smoother, more predictable finish. However, for initial rough sanding (400-600 grit), a good quality hardware store wet/dry paper can be perfectly adequate.
Q: “What’s the one mistake you see beginners make most often?”
A: Without a doubt, it’s impatience and skipping grits. Beginners often jump from a coarse grit (like 400) directly to a fine one (like 1500), thinking they’re saving time. What they end up with are deep scratches from the 400-grit that the 1500-grit can’t effectively remove, leading to a cloudy, uneven finish. The progressive refinement is crucial. Each grit removes the scratches of the previous one. We’ve all been that ‘sandpaper whirlwind’ eager for results, until we learned to appreciate the process itself. Slow and steady truly wins the race in BJD seam sanding.
Q: “My resin looks cloudy after sanding, what went wrong?”
A: Cloudiness usually indicates one of two things: either you haven’t gone through enough fine grits, or you’ve skipped a grit, leaving behind deeper scratches that are now visible. It can also happen if you’re dry sanding and resin dust is embedded in the surface. The solution is to go back to the last grit that gave you a clear, even surface (e.g., 800 or 1000) and meticulously work your way up again, ensuring thorough cleaning between each grit and using wet sanding techniques. Sometimes, a final polish with a plastic polishing compound can also help restore clarity.
Q: “Can I sand a matte-finish doll to be glossy?”
A: That’s an interesting question, and it touches on the limits of seam sanding. While you can certainly achieve a very smooth, even slightly shiny finish on a matte doll by going through all the fine grits and polishing, you won’t achieve a uniform, factory-gloss finish just by sanding the seams. A true glossy doll has a different surface treatment across its entire body. If you want a matte doll to be glossy all over, you’d be looking at a full body sanding and polishing project, or even a clear coat application, which goes far beyond just removing seam lines. This guide focuses specifically on achieving a flawless, seamless surface that matches the doll’s intended finish, whether that’s matte or semi-gloss.
Conclusion: Patience, Practice, and Perfect Resin
BJD seam sanding is more than just a technical skill; it’s a meditative process that connects you deeply with your doll. It demands patience, attention to detail, and a willingness to learn from every stroke of sandpaper. There will be moments of frustration, perhaps even a few “oops” moments that make you want to walk away. But I promise you, the satisfaction of running your fingers over a perfectly smooth, seamless resin surface is incredibly rewarding. It’s a testament to your dedication and care.
Remember, every seam you patiently smooth, every imperfection you meticulously correct, makes your doll more uniquely yours. It’s not just about removing a line; it’s about refining a canvas, which is essential for techniques like body blushing that bring your doll’s skin to life, preparing it for the next chapter of its story. Enjoy this journey, because this is precisely how we forge a deeper connection with our BJDs. Happy sanding, my fellow doll enthusiasts!
BJD Customization & Maintenance Series
- Your 2025 BJD Faceup Tutorial: A Pro’s Guide to Soulful Art
- How to String a BJD: A Veteran’s No-Nonsense Guide
- Pristine Resin: How to Clean a BJD Doll The Right Way
- BJD Customization: The Ultimate Guide to Personalizing Your Doll
- BJD Body Blushing: The Alchemist’s Guide to Skin That Breathes
- Make BJD Doll Eyes: An Alchemist’s Guide to Painting Soulful Gaze
- BJD Wig Styling Mastery: The Ultimate Care, Cutting & Customization Guide
- The Ultimate BJD Clothing Guide: Design, Patterns & Fit
- Ultimate BJD Storage Guide: Beat Yellowing with Pro Display Ideas
- BJD Faceup Pricing Guide: Unpacking Custom Eye Chips & Lip Blushing Costs
- Bringing Them Back to Life: Your Guide to BJD Restoration Service for Broken Fingers & Yellowed Resin
- BJD Stringing Kits: DIY Tightening for Stable, Pro Posing
- BJD Customization Services: Faceup & Full Body Blushing Guide
- BJD Body Modification: Sculpting Your Doll‘s Unique Form (2025 Guide)
- Mastering BJD Seam Sanding: A Pro’s Guide to Flawless Resin Finishes (You are here)
- BJD Joint Maintenance: Keeping Your Doll Posing Perfectly for Years
- BJD Eye Well Modification: Achieving Deeper, More Expressive Gaze
- Mastering Advanced BJD Faceups: Beyond Basics to Lifelike Artistry
- BJD Resin Whitening & Anti-Yellowing: A Collector’s Proven Guide to Preserve Beauty
- BJD Stringing Tension Guide: Optimizing Posing & Stability
- BJD Magnet Installation: The Ultimate Safety Guide to Unlocking Dynamic Posing