Introduction: The First Breath – From Resin to Rebirth
Let’s get one thing straight before we begin. You are not here to learn how to add a bit of pink to a doll’s knees. This is not your typical bjd body blushing tutorial. You are here to learn how to coax a soul into resin. You are here to become an alchemist.
For fifteen years, I have lived by a single creed: Body blushing is not coloring; it is the art of recreating the flow of light and blood on a sculpted form. The doll in your hands, whether it’s a pristine new Dollshe or a vintage, honey-yellowed Soom, is not a blank canvas. It is a sculpture. The artist who carved the original form has already done half the work for you. They have defined the bones, the muscles, the subtle dips and planes where life would naturally pool. Our job is not to fight that sculpture, but to listen to it. We are here to give it the one thing it lacks: the illusion of a circulatory system and the memory of light.
This guide is my grimoire. It’s the distillation of hundreds of successes and dozens of heart-wrenching failures. Forget the step-by-step lists you’ve seen. We will explore the why behind every action, the science behind every material, and the anatomy behind every shadow. Prepare to get your hands dirty. Prepare to feel a flicker of fear as you face that expensive, perfect resin. And prepare to feel an unparalleled surge of creation when you finally assemble your doll and it seems to, for the first time, take a breath. This is the true magic of BJD body blushing.
The Alchemist’s Bench: A Sanctuary of Tools
An alchemist is only as good as their laboratory. Clutter and poor-quality ingredients lead to explosions and failed transmutations. Your workspace is a sacred area. Keep it clean.
The Novice’s Essentials (The Non-Negotiables):
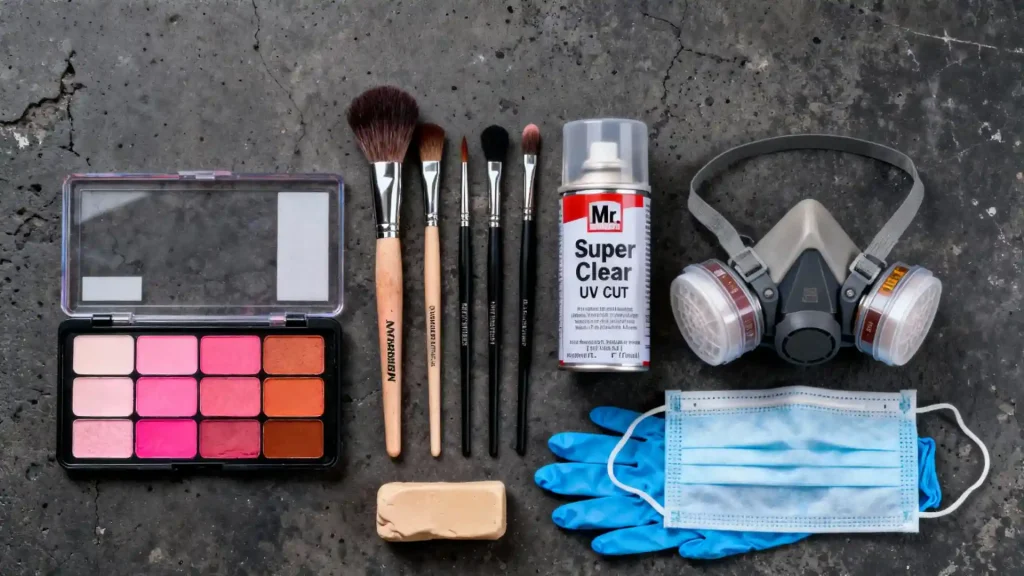
- Artist-Grade Soft Pastels: Forget the cheap, waxy sticks from the craft store. They are your enemy. They will skip, refuse to blend, and leave you with a chalky, childish finish. When selecting the best pastels for bjd body blushing, artist-grade is non-negotiable. Invest in a starter set of Rembrandt, Schmincke, or Sennelier. You need a good range of skin-adjacent tones: soft pinks, ochres, raw umbers, and surprisingly, a few muted blues and greens.
- A Set of Dedicated Brushes: Your makeup brushes have found a new calling. A fluffy powder brush, a denser blush brush, and a variety of eyeshadow brushes (a flat shader, a pencil brush, a fluffy blender) are your primary tools. Once they touch pastels, they are for dolls only.
- Mr. Super Clear (MSC) UV Cut Flat: This is the holy water of our craft. There are other sealants, but none have the legendary “tooth” of MSC. The UV Cut version is non-negotiable; it will protect your work and the resin from yellowing.
- A High-Quality Respirator Mask: Read this twice. A simple dust mask is not enough. You need a respirator with filters rated for organic vapors (an N95 or P100 rating with vapor cartridges is ideal). The chemicals in sealant are not a joke.
- Nitrile Gloves & Kneaded Eraser: Protect your doll from your skin’s oils, and your skin from the chemicals. The kneaded eraser is your magic wand for lifting mistakes.
The Master’s Upgrade (When You’re Ready to Ascend):
- PanPastels: These are a game-changer. They are ultra-fine, artist-quality pigments in a pan, applied with special sponges. They offer incredible intensity and control with minimal dust. Expensive, but worth every cent for their buttery application.
- An Airbrush: The ultimate tool for control. An airbrush allows you to apply sealant with surgical precision and create gradients so smooth they look like they were born on the resin. It’s a steep learning curve, but it unlocks a new level of realism.
- Detailing Tools: Tiny silicone “clay shapers” or “color shapers” for pushing pigment into tiny crevices like nail beds and nostrils.
Reading the Flesh – Preparing Your Canvas
Before a single speck of dust touches your doll, you must learn to read it. Different resins have different personalities.
- New, Pristine Resin (e.g., modern Luts, Volks): This is a perfect, non-porous surface. It’s slippery. Your primary challenge is creating a uniform tooth with your sealant so the pigment has something to grab onto. It’s forgiving of mistakes, as pigment can be wiped away easily before sealing.
- Aged, Yellowed Resin (e.g., older Soom, Dollzone): Do not see the yellowing as a flaw. It is a gift. It provides a warm, natural base tone that you could spend hours trying to replicate on a white doll. Your color choices will shift. Use cooler pinks and mauves to balance the warmth. Avoid yellows and oranges, which can make the doll look jaundiced.
- Modified or Sanded Resin: If you’ve sanded seam lines or modified a part, that area is now more porous than the factory-finish resin around it. It will drink up pigment and sealant differently. You must apply a slightly heavier initial coat of sealant to these areas to even out the surface porosity, or you will be left with ugly, dark patches that are impossible to blend.
Wipe the entire doll down with a clean cloth and, if you suspect any oils, a gentle wipe with a Magic Eraser (melamine foam). Let it dry completely. Now, disassemble it. Lay the pieces out on a clean cloth. Look at them. See the curve of the calf muscle, the sharp plane of the collarbone, the delicate hollow behind the knee. This is your map.
The Ritual of Life: A Step-by-Step Guide
Step 1: The Primer’s Breath – Conjuring the Micro-Tooth
This is the foundation of everything. A bad sealant job is a death sentence for your blushing.
The Principle: Mr. Super Clear is, essentially, a solvent-based acrylic lacquer. When you spray it, the solvents evaporate almost instantly, leaving behind a microscopic, matte lattice of acrylic particles. This creates a rough texture—what we call “tooth”—that acts like microscopic velcro, grabbing and holding the fine particles of your pastel dust. Without this tooth, you’re just rubbing dust on a slippery surface.
The Technique: First, safety. Go outside or to a very well-ventilated area. Wear your respirator and gloves. Shake the can for at least two full minutes. You should hear the little ball rattling freely. Hold the can about 12-15 inches (30-40cm) away from the doll part.
- The “Z-Spray” Method: For large parts like torsos and thighs, spray in a continuous, smooth motion. Start spraying before the stream hits the part, move across it in a “Z” or “S” pattern, and stop spraying after the stream has passed the part. This prevents thick, spitty deposits at the start and end of your pass.
- The “Point-Spray” Method: For small, complex parts like hands and feet, use short, controlled bursts. A quick “psst” is often all you need.
Let the parts dry for at least 30 minutes. The air will have that unique, slightly sweet chemical smell when it’s done right. The surface should look matte and feel faintly gritty, like the finest silk paper.
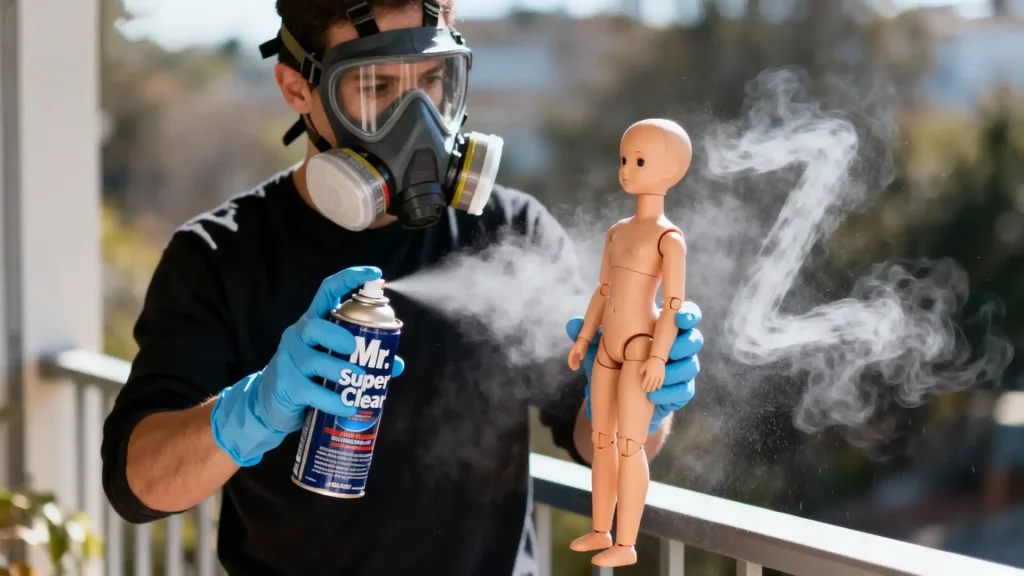
The Alchemist’s First Commandment: Safety
This is not a suggestion. This is a law. The solvents in aerosol sealants are neurotoxic and carcinogenic. This rule has no shortcuts. A cheap dust mask does nothing. An open window is not enough. You MUST use a properly fitted respirator with vapor cartridges. I have seen artists in this community develop chronic respiratory problems from ignoring this. Your lungs are infinitely more precious than your doll. Do not spray near open flames, pets, or other people. Treat this chemical with the profound respect it demands.
Disaster Briefing: I once witnessed a friend spray a highly coveted, limited-edition head on a humid, misty day. He was impatient. The moisture in the air was trapped by the sealant as it dried, causing it to cure into a cloudy, opaque white film. We call this “frosting.” The entire head, every crisp detail of the sculpt, was obscured by an irreversible, milky plague. It was like the resin had developed cataracts.
Emergency Protocol: If you see frosting occur, you have one small window of opportunity. Sometimes, a gentle blast with a hairdryer on low heat can help the moisture evaporate before it’s fully trapped. If it’s already cured, your only hope is a full strip, which involves harsh chemicals or painstaking sanding and a high risk of softening details. The best cure is prevention: NEVER spray in high humidity or extreme cold.
Step 2: The Cartography of Flesh – Mapping Light & Shadow
Put the pastels down. Before you apply a single grain of color, you must create a mental “color map.” This is where we apply the principle of light and shadow anatomy.
Think about your own body. Where does your skin have more color? The knuckles, the knees, the elbows—places where the skin is thin over bone and blood vessels are close to the surface. Where does it look paler or have cooler tones? The fleshy part of the thigh, the flat of the stomach, the hollows of the throat.
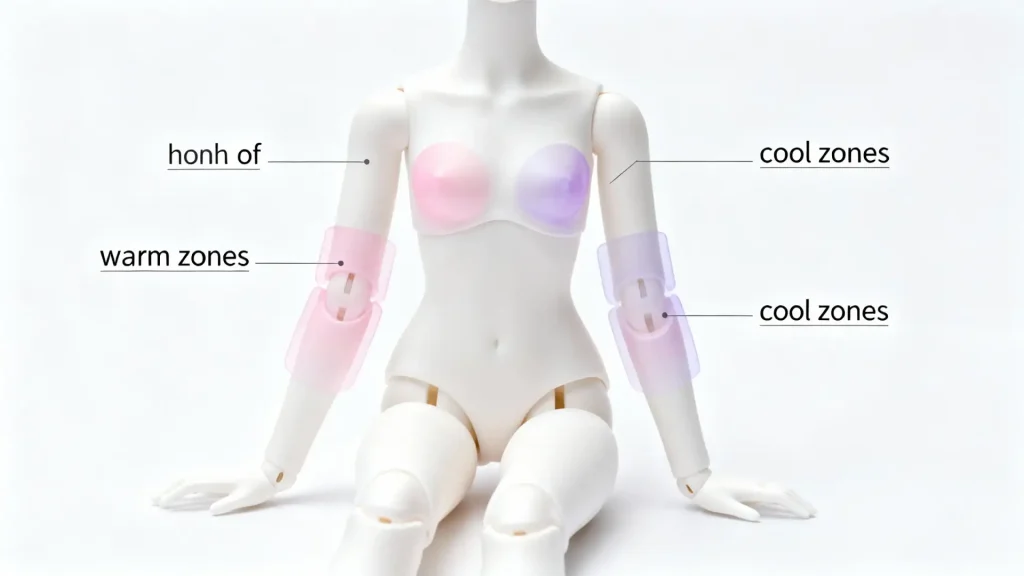
- Warm Zones (The Blood): These are your areas of life. Use soft pinks, peaches, and light reds.
- Primary: Knees, elbows, knuckles (all of them, not just the main ones), the curve of the heel, the tips of the toes and fingers.
- Secondary: The chest above the breasts, the shoulder blades, the curve of the buttocks, the inner thighs.
- Cool Zones (The Shadows): These are your areas of depth and structure. Use incredibly subtle amounts of muted blues, lavenders, or even sea greens.
- Primary: The hollow of the throat, under the jawline, the small of the back, the abdomen (especially defining the muscles if the sculpt has them), the inner arches of the feet. For the deepest, sharpest crevices like the lines of the palm, we have a more potent technique we’ll use later—the 【Tea-Staining Method】—but for now, we map the broader shadows with pastels.
- Highlights (The Light): These are areas you will leave mostly bare, allowing the base resin color to act as a natural highlight.
- Primary: The top of the shoulders, the center of the collarbones, the kneecap itself (the color goes around it), the front of the shins.
Take a moment. Touch these places on your own body. See how the color isn’t a flat circle, but a complex gradient that follows the form. This is what we will replicate.
Step 3: The Layering of Life – Application Alchemy
Now, we bring color to the canvas. Scrape a small amount of pastel dust from your stick onto a piece of paper. This is your palette.
The Principle: We are not painting. We are staining the tooth of the sealant in thin, translucent layers. Each layer is sealed before the next is applied. This builds up a depth and realism that a single, heavy application can never achieve.
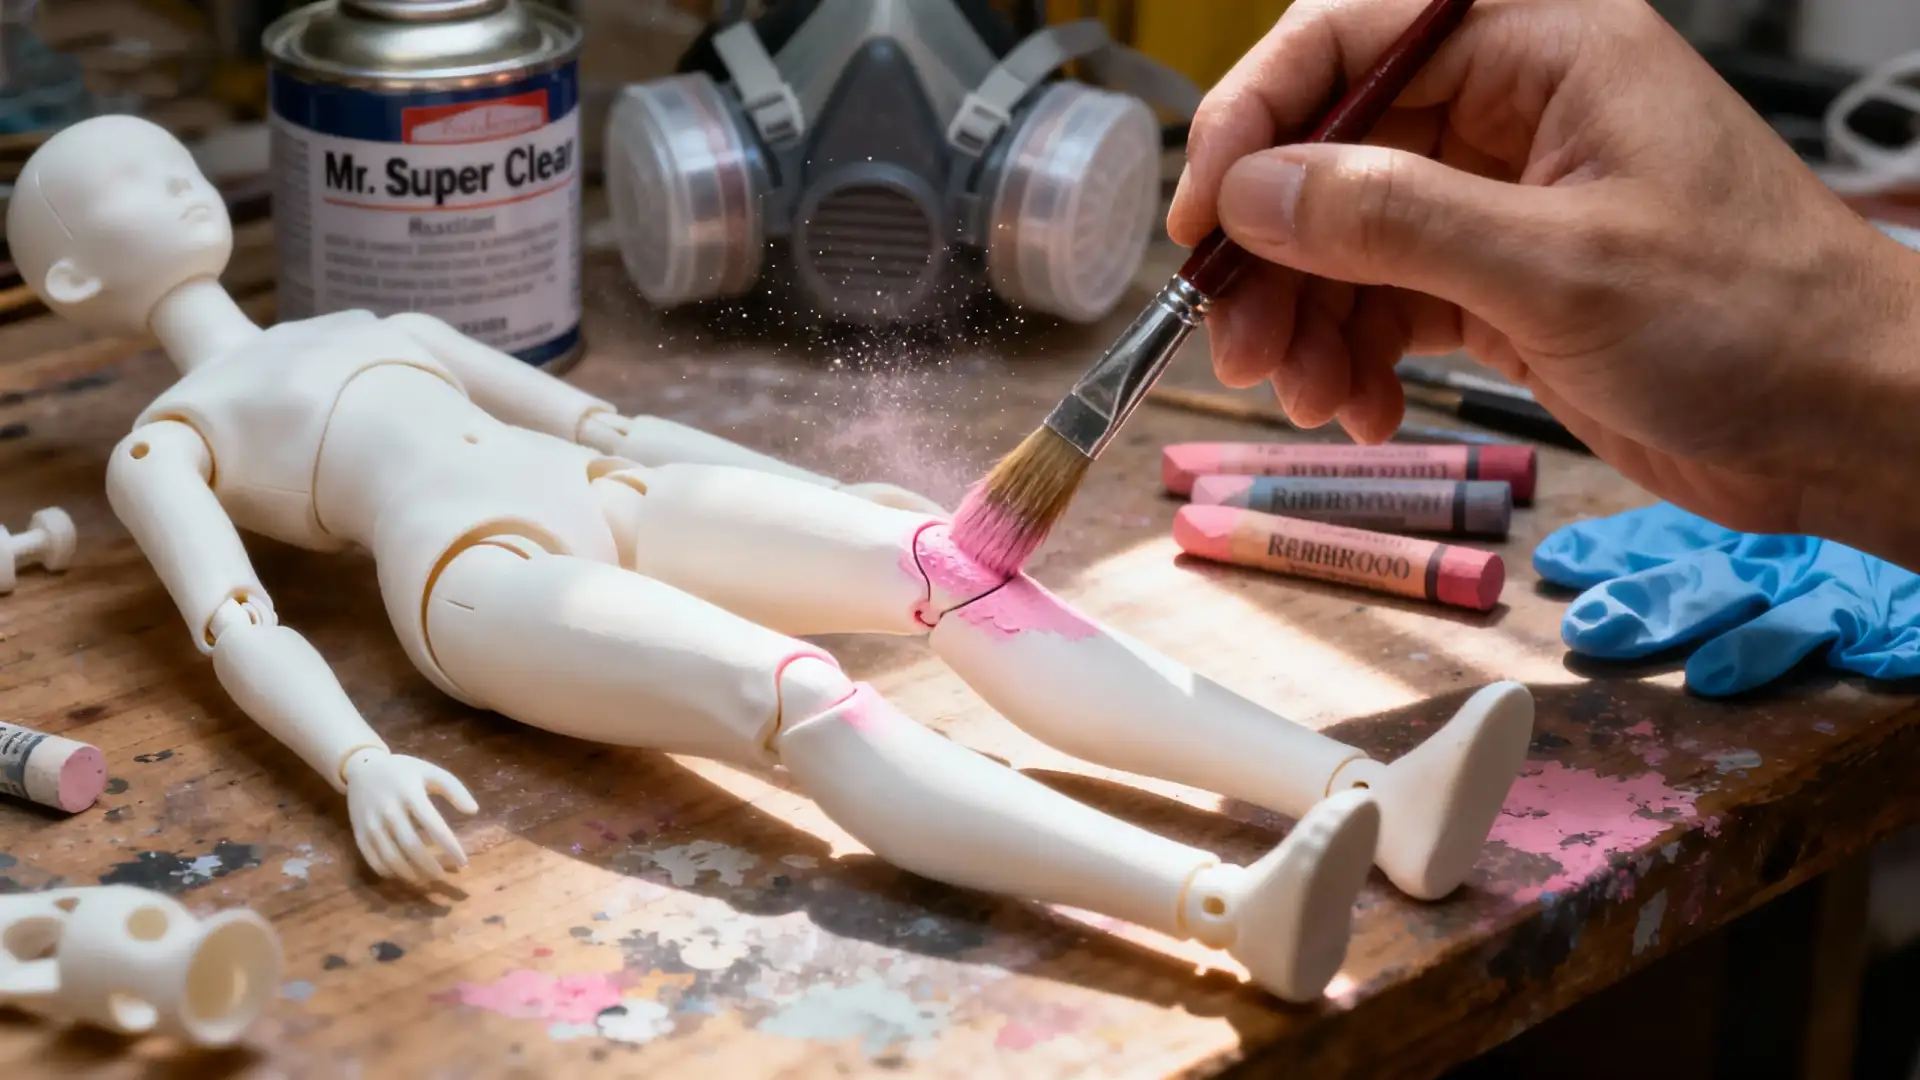
- The “Tapping/Pouncing” Method: Load a dense, flat brush with a small amount of pigment. Tap off the excess. Using a gentle, vertical tapping or “pouncing” motion, deposit the color onto the target area, like a knee or knuckle. This concentrates the color in the center.
- The “Rubbing/Scumbling” Method: Load a fluffy brush with a very small amount of pigment. Using light, circular or sweeping motions, apply broad, soft areas of color, like the warmth on a shoulder blade or the subtle shadow on a stomach.
Start with your main warm zones. Apply a light, shy layer of pink to the knees and elbows. Don’t try to make it perfect. This is just the first whisper of life.
Disaster Briefing: The dreaded “Clown Knee.” A novice, eager for results, grinds a bright red pastel directly onto the knee and smudges it with their finger. The result is a single, opaque, garish red circle that looks like a painful rash or, well, clown makeup. It has no gradient, no subtlety, and screams “I’m painted!”
Emergency Protocol: If you haven’t sealed it yet, you’re in luck. Take your kneaded eraser and gently press it onto the heavy pigment. Don’t rub. Press and lift. It will pull up the excess pastel dust. Then, take a clean, dry, fluffy brush and blend the edges of what remains. If it’s still too much, a gentle wipe with a dry Q-tip can remove more.
Step 4: The Ghost’s Touch – Blending Into Nothingness
Color is nothing without a gradient. A perfect blush is one where you cannot see where it begins or ends.
The Principle: Blending is the physical act of spreading pigment particles more thinly across the sealant’s tooth until they become invisible to the naked eye. The right tool acts as a gentle broom, feathering the edges of your color deposit into the surrounding area.
The Technique: After tapping on your central color, take a clean, fluffy brush (your blending brush). With no pigment on it, use the very tips of the bristles to gently whisk at the edges of the color. Use light, flicking motions, always moving from the colored area outwards into the blank area. For larger areas, a makeup sponge or even a clean finger (if you’re wearing a glove!) can create soft, diffused blends. For tiny crevices, a Q-tip is your best friend.
This is where my most painful, and most valuable, lesson was learned. My first doll was a Soom Super Gem, a magnificent sculpt that I had saved for months to afford. I was so excited. I laid out the parts on my balcony on a grey, drizzly afternoon, telling myself the air was “dry enough.” I sprayed my first coat of sealant. It frosted. Not everywhere, just in patches. My heart sank. In a panic, I tried to wipe it off, smearing the half-cured lacquer. I sat on the floor of my workshop, this beautiful, expensive doll in pieces, looking like it had some terrible skin disease. I felt my dream of creating beautiful dolls die right there.
After a day of mourning, I picked up a piece. I took a sheet of 1000-grit wet/dry sandpaper, the kind used for polishing cars. With infinite patience and a bowl of water, I began to sand. For hours, I carefully, lovingly sanded away the ruined sealant, polishing the resin back to its original sheen. It was a baptism by fire. I learned about humidity, about patience, and about the resilience of resin. That doll, eventually, was saved. And it taught me more than any perfect application ever could.
Step 5: The Alchemist’s Embellishments – Detailing the Soul
With your foundational blushing and shadows laid, it is time to add the final, defining details. These are not mere decorations; they are advanced applications of our core philosophy, pushing realism to its peak. These techniques are best applied after your main color layers are established but before your final sealing coat.
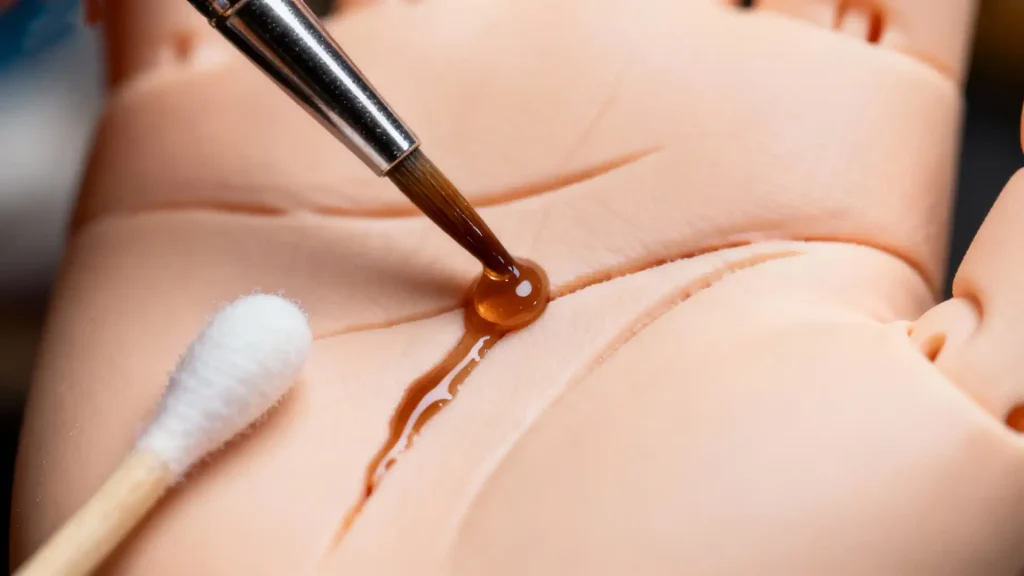
- 【The Tea-Staining Method】: Pastels create soft shadows, but real bodies have sharp, deep lines. To replicate this, take a tiny drop of brown or raw umber acrylic paint and dilute it with water until it’s the consistency of weak tea. Using a superfine brush, touch it into a crevice like a palm line or between fingers. Capillary action will draw the “tea” along the line. Immediately, use a clean, damp Q-tip to wipe away the excess from the flat surfaces, leaving only a perfect, subtle shadow in the line itself. This is the ultimate expression of anatomical shadow, turning a sculpted line into a true fold of flesh.
- 【The Shimmer Enchantment】: Real skin isn’t perfectly matte; it has a subtle sheen where it stretches over bone. This is not about glitter. Take a tiny, tiny amount of a fine, non-glittery pearlescent eyeshadow powder (a champagne or soft ivory color works best). With a small, soft brush, dust an almost imperceptible amount onto the highest points of the body that would catch the light: the very crest of the collarbones, the sharpest points of the shoulder blades, and the center of the shins. This is an application of light theory, creating a specular highlight that should only be visible when the light hits it just right. It’s an enchantment, not a statement.
- 【The Freckle Flicking】: To create the beautiful chaos of natural skin, dilute some brown acrylic paint. Dip a stiff-bristled brush (an old toothbrush works wonders) into the thinned paint, dab most of it off on a paper towel, and then aim it at the doll. Use your thumb to flick the bristles, spattering a fine, random pattern of dots onto the surface. Practice on paper first to get the consistency and pressure right. This breaks the perfection of the surface, introducing the random “flaws” that make something feel truly alive.
The Final Incantation – Sealing Your Soulful Work
After your layers of blushing, blending, and embellishing are complete, take the parts back to your spraying station. Apply another very light coat of sealant—a “fixative” coat. This locks in your work and prepares a new layer of tooth if you wish to add more depth. Most blushing requires 2-4 layers to achieve a rich, realistic look.
When you are completely satisfied, apply one final, slightly more robust coat of sealant. Learning how to properly go about sealing bjd body blushing is as crucial as the application itself. Let it cure for at least 24 hours before handling or stringing. The satisfying click and snap of reassembling a freshly blushed body is one of the greatest joys in this hobby.
The Resin E.R. – Triage for Alchemical Accidents
Even seasoned alchemists have lab accidents. Here’s how to handle them.
- Symptom: My blushing looks patchy and splotchy, like a skin condition.
- Diagnosis: Your surface was likely contaminated with skin oils, or your sealant coat was uneven.
- Prescription: Before sealing, always wipe the doll with a lint-free cloth. If you suspect oils, use a Magic Eraser. If the sealant is patchy, you may need to strip it and start again. Prevention is key.
- Symptom: The pastel dust won’t stick! It just brushes right off.
- Diagnosis: Your sealant coat is too thin/non-existent, or your pastels are too waxy and hard.
- Prescription: Ensure you have a good, even coat of MSC. If the surface feels smooth, you need more tooth. And throw away those cheap pastels. They are not worth the frustration.
- Symptom: I sealed my beautiful, vibrant work, and the color almost vanished!
- Diagnosis: This is a known and predictable optical effect of matte sealants. It’s not your imagination. This is because the microscopic, rough texture of a matte sealant causes diffuse light reflection. This scattering effect slightly lowers our eye’s perception of the underlying pigment’s saturation.
- Prescription: Experience. You will learn to apply your colors about 15-20% more vibrantly than you want the final result to be. The sealant will provide the final, subtle muting effect that brings it to a natural state. Trust the process.
Conclusion: Your Signature in Light and Shadow
Look at your doll. It is no longer a collection of resin parts. The knees are flushed from kneeling. The fingertips are pink with blood flow. The shadows in the hollows of its body suggest muscle and bone, form and function. You have not painted it. You have imbued it with a story.
This process, this alchemical ritual of BJD body blushing, is a journey. It is a conversation between you, the sculptor, and the materials. Your choices, your touch, your unique understanding of how light falls and how blood flows, are now permanently etched into its skin. You have left your signature not in ink, but in light and shadow.
Now, go. Your laboratory awaits. There is resin waiting for its first breath.
BJD Customization & Maintenance Series
- Your 2025 BJD Faceup Tutorial: A Pro’s Guide to Soulful Art
- How to String a BJD: A Veteran’s No-Nonsense Guide
- Pristine Resin: How to Clean a BJD Doll The Right Way
- BJD Customization: The Ultimate Guide to Personalizing Your Doll
- BJD Body Blushing: The Alchemist’s Guide to Skin That Breathes (You are here)
- Make BJD Doll Eyes: An Alchemist’s Guide to Painting Soulful Gaze
- BJD Wig Styling Mastery: The Ultimate Care, Cutting & Customization Guide
- The Ultimate BJD Clothing Guide: Design, Patterns & Fit
- Ultimate BJD Storage Guide: Beat Yellowing with Pro Display Ideas
- BJD Faceup Pricing Guide: Unpacking Custom Eye Chips & Lip Blushing Costs
- Bringing Them Back to Life: Your Guide to BJD Restoration Service for Broken Fingers & Yellowed Resin
- BJD Stringing Kits: DIY Tightening for Stable, Pro Posing
- BJD Customization Services: Faceup & Full Body Blushing Guide
- BJD Body Modification: Sculpting Your Doll‘s Unique Form (2025 Guide)
- Mastering BJD Seam Sanding: A Pro’s Guide to Flawless Resin Finishes
- BJD Joint Maintenance: Keeping Your Doll Posing Perfectly for Years
- BJD Eye Well Modification: Achieving Deeper, More Expressive Gaze
- Mastering Advanced BJD Faceups: Beyond Basics to Lifelike Artistry
- BJD Resin Whitening & Anti-Yellowing: A Collector’s Proven Guide to Preserve Beauty
- BJD Stringing Tension Guide: Optimizing Posing & Stability
- BJD Magnet Installation: The Ultimate Safety Guide to Unlocking Dynamic Posing