Indoor BJD Photography Made Easy: Your Path to Stunning Shots Without Fancy Gear
Oh, my dear fellow BJD enthusiast, I remember it like yesterday. The quiet hum of the afternoon, a gentle ray of sunlight filtering through my window, and my beloved Volks SDGr girl, nestled perfectly on a velvet cushion. I had just gotten her, and my heart ached to capture the ethereal beauty I saw in her eyes, the story I felt she held within. But all I had was my trusty smartphone and a dream. I used to think an expensive camera was the only way to truly do her justice, until I discovered how a simple window and a white card could create the most dreamlike catchlights in her eyes, making her almost breathe. That day, a breakthrough happened for me, and I realized that the magic wasn’t in the gear, but in the heart behind the lens.
For over a decade, I’ve been on this incredible journey, not just collecting these exquisite dolls, but learning to be an “emotion creator” through my camera. I’ve had my share of blurry shots, awkward poses, and frustrating lighting, believe me! But through every stumble, I’ve learned invaluable lessons that I’m so excited to share with you today. My mission is to empower you, whether you’re a complete beginner or feel creatively stuck, to create professional-looking BJD photos right in your own home, using the equipment you already have – yes, even just your smartphone! Forget the intimidating studio setups; we’re going to unlock the soul of your doll with light, composition, and a whole lot of love. These BJD photography tips are designed to make your journey joyful and rewarding.
Chapter 1: Let There Be Light: Your Guide to a cheap lighting setup for doll photography
Light, my friends, is the paintbrush of emotion. It sculpts, it reveals, it tells a story. When I first started, I thought I needed expensive strobes and fancy diffusers. What a myth! The truth is, the most beautiful light is often the simplest, and it’s usually free. Let’s debunk that myth together and build a cheap lighting setup for doll photography that will make your dolls glow.

Your Best Friend: The Magic of Window Light
This is my absolute go-to, my secret weapon, and it costs absolutely nothing. A large window, especially one facing north (for consistent, soft light throughout the day) or east/west (for beautiful morning/evening light), is a treasure trove.
- How I use it: I position my doll a few feet away from the window, never directly in harsh sunlight. Direct sun creates harsh shadows and blown-out highlights, which can be very unflattering. Instead, I look for that soft, diffused light that gently wraps around her.
- My personal trick: If the light is still a bit too strong, I’ll hang a sheer white curtain or even a thin white bedsheet over the window. This acts as a giant, natural softbox, softening the light beautifully. I remember one rainy afternoon, feeling frustrated by the dim light, I simply moved my doll closer to the window, and suddenly, her eyes sparkled with life. It was a revelation!
DIY on a Dime: Your First Softbox for Gentle Light
Sometimes, window light isn’t enough, or you want more control. Don’t rush out to buy expensive gear! We can create a fantastic, cheap lighting setup for doll photography with items you likely have around the house.
- The “Desk Lamp + Tissue Paper” Softbox: Grab any desk lamp or clip-on light you have. For the diffuser, I’ve used everything from a few layers of white tissue paper (secured with clothespins, carefully, away from the bulb to avoid fire hazards!), to a thin white plastic bag, or even a piece of parchment paper. The goal is to spread and soften the light, eliminating harsh shadows.
- My advice: Experiment with the distance of the light source from your doll. Closer light is softer and more dramatic; further light is broader and more even. I once used a simple LED flashlight covered with a piece of baking paper to create a dramatic spotlight for a moody shot – the results were surprisingly professional!
The Secret Weapon: Crafting a Simple Reflector for Living Eyes
Even with beautiful window light or a DIY softbox, one side of your doll might still be a bit shadowy. This is where a reflector comes in, bouncing light back onto your doll to fill in those shadows and, crucially, create those captivating catchlights in her eyes.
- What I use: A piece of white foam board, a sheet of white cardstock, or even a crumpled piece of aluminum foil (smooth it out for a softer reflection, crumple it slightly for a more sparkly one).
- How I position it: Place the reflector opposite your main light source, angled to bounce light back onto your doll’s face. Watch her eyes! You’ll see tiny pinpricks of light appear – those are the catchlights, and they bring your doll to life. I learned this the hard way when I couldn’t figure out why my doll’s eyes looked so flat. A simple white card changed everything, making her gaze feel alive and engaging.
Chapter 2: Unleash Your Smartphone: Essential Smartphone BJD Photography Tips
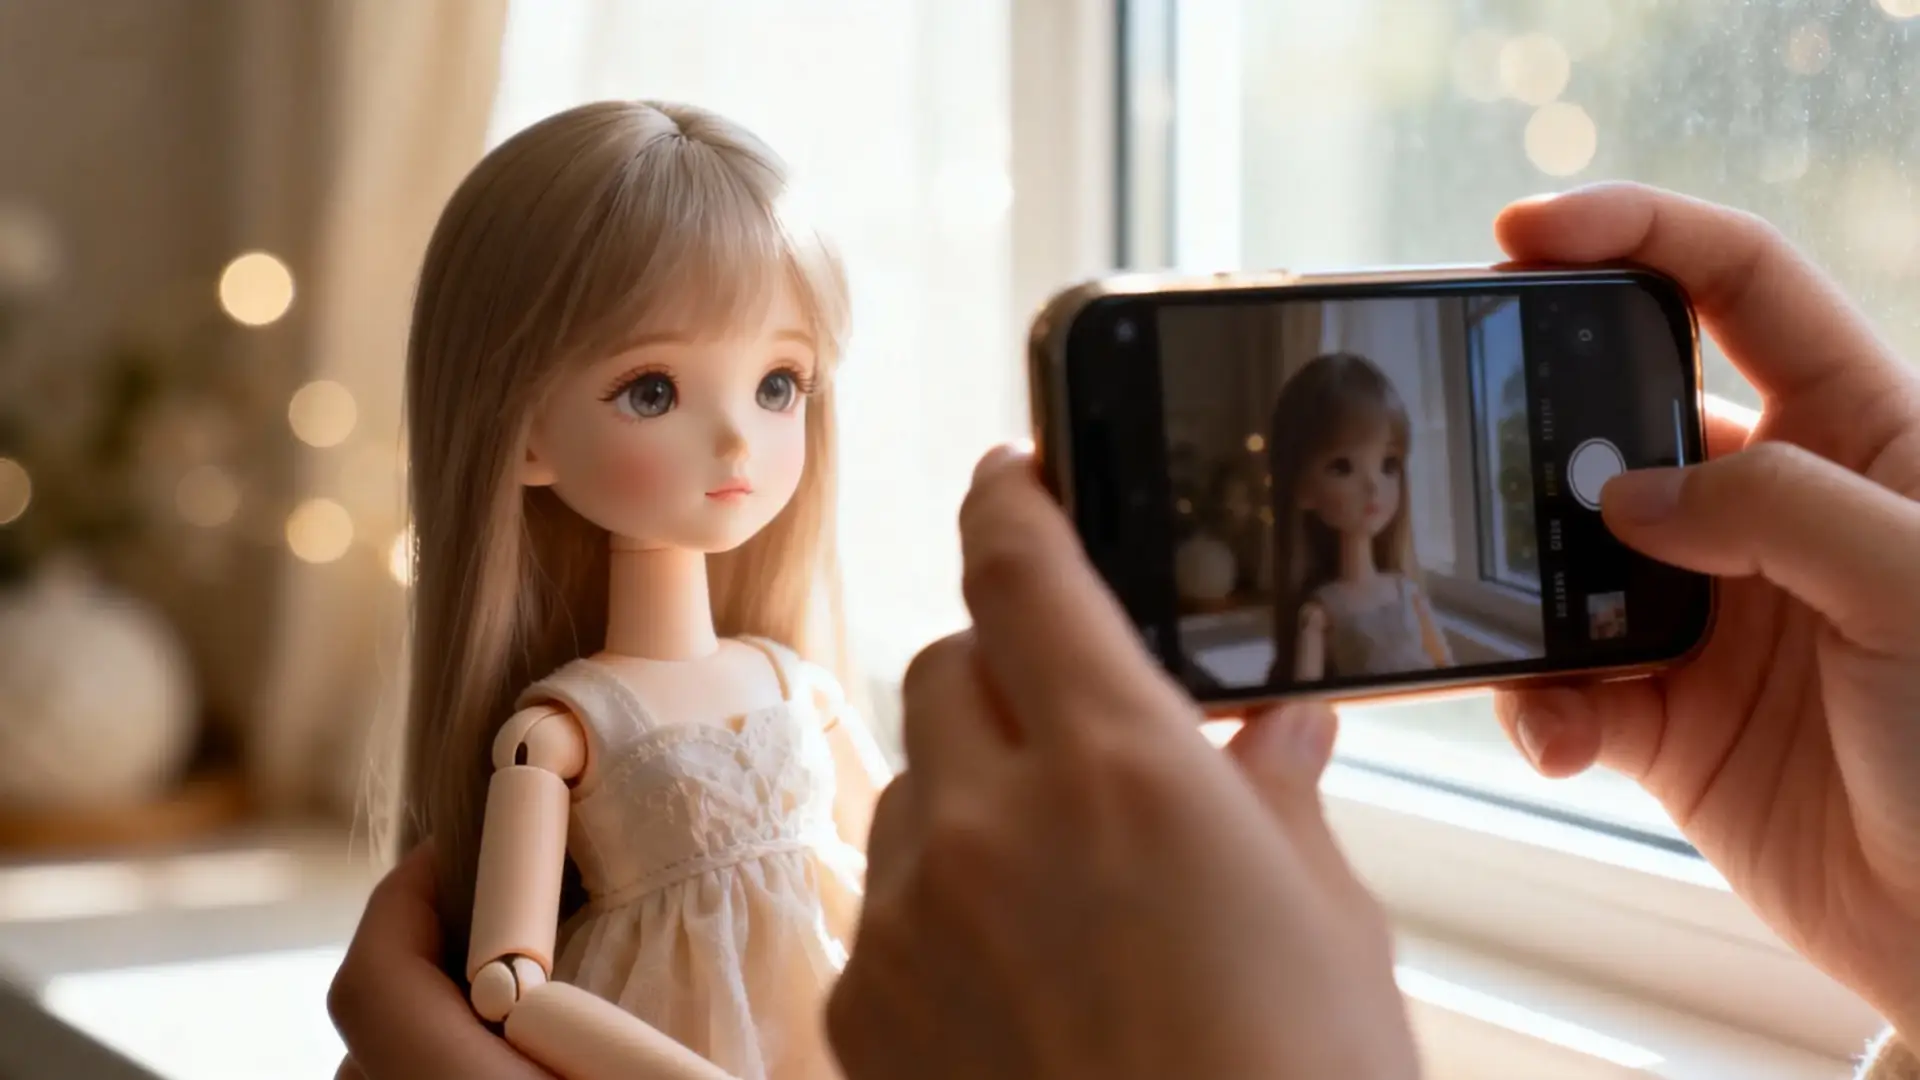
The best camera, as they say, is the one you have with you. And for many of us, that’s our smartphone! Don’t underestimate its power. With a few smart techniques, your phone can capture truly stunning BJD photos indoors. These smartphone BJD photography tips will transform your mobile photography.
Tap to Focus & Lock: The Most Overlooked Superpower
This is fundamental, yet so many people miss it! Your phone’s camera tries to guess what you want to focus on, but it’s not always right, especially with a small subject like a BJD.
- My method: Open your camera app, then tap directly on your doll’s eyes on the screen. You’ll see a square or circle appear, indicating focus. Then, tap and hold that spot for a second or two until “AE/AF Lock” (Auto Exposure/Auto Focus Lock) appears. This locks both your focus and exposure, ensuring your doll stays sharp and well-lit even if you move your phone slightly.
- Why it matters: I can’t tell you how many early photos I took where my doll’s nose was sharp, but her eyes were soft. Locking the focus on the eyes is paramount for capturing that anthropomorphic soul.
Portrait Mode & Proximity Hacks: Faking a Dreamy Background
One of the most coveted effects in photography is a beautifully blurred background, known as “bokeh.” It makes your doll pop! While dedicated cameras do this naturally, smartphones have clever ways to simulate it.
- Portrait Mode: Most modern smartphones have a “Portrait Mode” (or similar, like “Live Focus” on Samsung). This mode uses software to separate your subject from the background and artificially blur the latter.
- Proximity Hack: If your phone doesn’t have Portrait Mode, get closer to your doll! The closer your camera is to your subject, and the further your subject is from the background, the more natural background blur you’ll achieve. This is a simple yet effective trick I’ve used countless times.
- My experience: I remember trying to get that dreamy background with an older phone. I learned that by placing my doll just a foot or two in front of a background that was several feet away, I could achieve a surprisingly pleasing blur, even without fancy modes.
Banish the Blur: The Quest for Crystal-Clear Stability
Nothing ruins a great shot faster than blur caused by camera shake. Especially in indoor, lower-light conditions, your phone’s shutter speed might slow down, making it more susceptible to blur.
- My solution:
- Use a Tripod (or DIY one): A small, flexible phone tripod is a fantastic investment. If you don’t have one, prop your phone against a stack of books, a mug, or anything stable.
- Self-Timer: Use your phone’s self-timer (2 or 3 seconds) to eliminate shake from pressing the shutter button.
- Remote Shutter: If you have Bluetooth headphones, their volume buttons often double as a remote shutter! This is a game-changer for stability.
- A lesson learned: Early on, I’d get so frustrated with slightly blurry photos. I thought my phone was just bad. Then I started using a tiny, cheap tripod and the self-timer, and suddenly, my images were consistently sharp. It was a simple fix that made a world of difference.
- For the truly adventurous: If you’re craving even more control, some third-party camera apps like ProCam (iOS) or FiLMiC Pro (iOS/Android) allow you to manually adjust shutter speed, ISO, and white balance, turning your smartphone into a surprisingly powerful tool for BJD photography. It’s a fantastic, low-cost way to explore advanced settings without investing in a dedicated camera.
Chapter 3: The Art of Posing: Giving Your Doll a Soul
Posing is the silent language of your doll. It’s what separates a static picture from a portrait that tells a story. This is where you, the “emotion creator,” truly shine. These BJD posing ideas for beginners will help you bring your dolls to life.
The “S-Curve” Rule: Escaping the Stiff Soldier Pose
BJDs are articulated, but if you just stand them up straight, they can look stiff and lifeless. My goal is always to make them look natural, almost as if they could move at any moment.
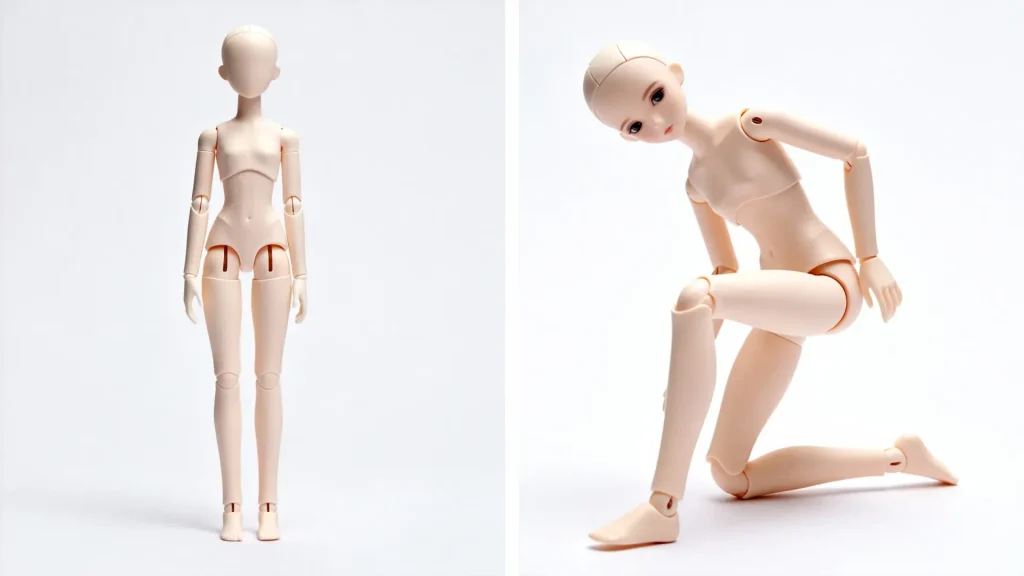
- My technique: Think of the human body. We rarely stand perfectly straight. We shift our weight, our hips tilt, our shoulders drop. For your doll, try to create a subtle “S” curve through their body.
- Slightly bend one knee.
- Tilt the hips.
- Angle the torso slightly.
- Let one shoulder be a little lower than the other.
- Bend the elbows and wrists gently.
- Why it works: This subtle asymmetry makes the pose dynamic and natural. I remember struggling to make my doll look relaxed. Once I started thinking about how a human would naturally stand or sit, and applied that “S-curve” principle, her poses instantly became more graceful and believable.
BJD Posing Ideas for Beginners: Interaction & Micro-Stories
Don’t just pose your doll; give her something to do or react to. This creates a micro-story within your frame.
- Interaction with Props: Have her hold a tiny teacup, read a miniature book, or gaze at a small flower.
- Interaction with the Environment: Have her lean against a wall, sit by a window, or peer over a miniature fence.
- Expressing Emotion: A slight tilt of the head, a gentle curve of the hand, or the angle of the shoulders can convey curiosity, sadness, joy, or contemplation.
- My favorite approach: I often imagine a little scenario for my doll. Is she waiting for someone? Is she lost in thought? Is she admiring something? Once I have that story in my head, the poses flow much more naturally. For example, if she’s “reading,” I’ll pose her hands gently holding the book, her head slightly tilted, and her gaze directed downwards.
The Gaze is the Story: Directing Emotion Through the Face-Up
Your doll’s face-up is a masterpiece, and her eyes are the windows to her soul. Directing her gaze is crucial for conveying emotion and engaging the viewer.
- Where to look:
- Directly at the camera: Creates a powerful, intimate connection with the viewer.
- Slightly off-camera: Suggests she’s looking at something just outside the frame, inviting curiosity.
- Downwards: Can convey contemplation, shyness, or sadness.
- Upwards: Can suggest hope, wonder, or prayer.
- My personal tip: Pay close attention to the angle of the head and the direction of the eyes. Even a millimeter can change the entire mood. I often adjust the head and eyes until I feel that “spark” – that moment where her gaze truly tells the story I want to convey. It’s a subtle art, but incredibly rewarding.
Chapter 4: Crafting the Scene: BJD Photography Composition & Storytelling
A great photo is a complete world, not just a pretty doll. It’s about how all the elements within your frame work together to tell a compelling story. This is where BJD photography composition comes into play.
A Fantastic Starting Point: The Rule of Thirds for Dolls
The Rule of Thirds is a classic compositional guideline that helps create balanced and engaging images. While you don’t have to follow it every time, I find it to be a fantastic starting point for creating balance, but feel free to break it once you’re comfortable!
- How it works: Imagine your frame divided into nine equal sections by two horizontal and two vertical lines (many phone cameras have a grid overlay you can turn on!). The idea is to place your doll, or key elements of your doll (like her eyes), along these lines or at their intersections.
- My application: Instead of placing my doll dead center, I often position her slightly to the left or right, along one of the vertical lines. This creates a more dynamic image and leaves space for the viewer’s eye to wander. I remember when I first started, all my dolls were centered. Once I began experimenting with the Rule of Thirds, my photos instantly felt more professional and interesting.
Guiding the Eye: The Power of Your Doll’s Gaze
Beyond just where your doll is placed, where she looks can dramatically influence how a viewer experiences your photo. Her gaze is a powerful visual cue, a silent arrow pointing to something important, or inviting the viewer to wonder.
- Creating Visual Flow: If your doll is looking off-frame, the viewer’s eye will naturally follow that direction, creating a sense of anticipation or suggesting a larger world beyond the shot. If she’s looking at a prop, it draws attention to that object and strengthens the narrative.
- My personal technique: I often use her gaze to lead the viewer’s eye through the composition. For instance, if I want to highlight a delicate accessory she’s wearing, I might pose her looking down at it. Or, if I want to evoke a sense of longing, I’ll have her gaze fixed on an empty space in the distance. It’s like she’s whispering a secret to the viewer, guiding them through her story.
Breaking the Rules: When to Go Off-Grid
While rules like the Rule of Thirds are excellent guides, sometimes the most impactful photos come from deliberately breaking them. This is where your artistic intuition truly shines.
- My “Rebel” Move: I sometimes intentionally place my doll far off-center, almost at the very edge of the frame, leaving a vast expanse of empty space. This isn’t a mistake; it’s a deliberate choice to evoke a specific emotion. It can create a profound sense of loneliness, anticipation, or even overwhelming scale, making the doll feel small in a big world. It’s a powerful way to tell a story without words, and it’s a technique I discovered through playful experimentation, realizing that sometimes, the “wrong” composition felt exactly right for the mood I wanted to convey.

Simple & Effective Doll Photography Background Ideas
The background is just as important as your doll. It sets the mood and context. You don’t need elaborate dioramas; simple can be stunning.
- My go-to backgrounds:
- Solid Colors: A large sheet of craft paper, a plain wall, or even a clean bedsheet in a neutral color (white, grey, black, pastels) makes your doll stand out.
- Textured Fabrics: A piece of velvet, linen, or even a knitted blanket can add depth and interest without distracting.
- Natural Elements: A blurred plant, a simple wooden surface, or a stack of books can provide a lovely, organic feel.
- Miniature Scenes: If you have a small dollhouse furniture piece or a miniature prop, use it sparingly to create a sense of scale.
- A word of caution: Avoid cluttered backgrounds that compete with your doll. My advice is always to simplify. I once tried to photograph a doll in front of a busy bookshelf, and she just got lost. A simple, blurred fabric background made her the undeniable star.
Props That Tell a Story, Not Steal the Show
Props can add context, personality, and a narrative to your photos, but they should always enhance, not overpower, your doll.
- My philosophy: Choose props that are in scale with your doll and relevant to the story you’re trying to tell. A tiny teacup, a miniature book, a delicate flower, a small piece of jewelry – these can add so much.
- Placement is key: Don’t just plonk a prop down. Have your doll interact with it, or place it strategically to guide the viewer’s eye.
- Less is often more: I’ve learned that one well-chosen prop is far more effective than a dozen random items. I once used a single, perfectly scaled miniature rose to convey a sense of delicate beauty, and it spoke volumes.
Chapter 5: A Touch of Magic: Simple Post-Processing on Your Phone
Even the most perfect shot can benefit from a little polish. Think of post-processing as the final touch, like adding a delicate ribbon to a beautifully wrapped gift. You don’t need complex software; your phone has powerful tools built-in or available for free.
Your Free Digital Darkroom: Snapseed & Lightroom Mobile
These are my two absolute favorite free (or freemium) apps for mobile editing. They offer incredible control without being overwhelming.
- Snapseed (Google): Incredibly intuitive. I love its “Selective” tool for brightening specific areas (like eyes!) and its “Tune Image” for overall adjustments.
- Lightroom Mobile (Adobe): Offers more granular control, especially over color and tone curves. The “Light” and “Color” panels are where I spend most of my time.
- My recommendation: Download both and play around! You’ll quickly find which one resonates with your editing style. I started with Snapseed because of its simplicity, and it taught me the fundamentals before I ventured into Lightroom Mobile.
The Three-Minute Edit: Brightness, Contrast, and Color
You don’t need hours to edit. A quick, focused edit can make a huge difference. My “three-minute edit” focuses on these core adjustments:
- Brightness/Exposure: Is your photo too dark or too bright? Adjust this first to get a good base.
- Contrast: This adds “pop” to your image, making the darks darker and the lights lighter. Be careful not to overdo it, or your image will look harsh.
- White Balance/Color Temperature: This is crucial for accurate skin tones and wig colors. If your photo looks too yellow (warm) or too blue (cool), adjust the white balance slider until the colors look natural. I often use a neutral grey area in the photo as a reference.
- Sharpening (Subtly!): A tiny touch of sharpening can make details (like eyes and face-up) stand out. Over-sharpening looks artificial.
- My golden rule: Always aim for natural enhancements, not drastic alterations. The goal is to bring out the beauty that’s already there, not to create something entirely new. I’ve learned that less is often more when it comes to editing.
Chapter 6 [Optional Bonus]: For the Adventurous – Demystifying best camera settings for BJD photography
If you’ve ventured beyond your smartphone and have a camera with manual controls (even a basic mirrorless or DSLR), understanding these settings will unlock even more creative potential. Don’t be intimidated; it’s simpler than it seems! These are the best camera settings for BJD photography to get that professional look.
Aperture (f-stop): Your Key to That Dreamy Background
Aperture controls two things: how much light enters your lens and, more importantly for us, the depth of field (how much of your image is in focus).
- Think of it: As making your doll the star on a stage, while the background melts away into a soft, beautiful blur. This is ‘shallow depth of field,’ and it’s the secret to making your doll truly pop.
- My setting: For that dreamy, blurred background, I use a wide aperture (a small f-number, like f/1.8, f/2.8, or f/4). The smaller the f-number, the blurrier the background will be.
- A word of caution: With a very wide aperture, your depth of field is very shallow, meaning only a tiny slice of your image will be in focus. Make sure your doll’s eyes are perfectly sharp!
ISO: Keeping Your Photos Clean and “Grain-Free”
ISO determines your camera’s sensitivity to light.
- My goal: I always try to keep my ISO as low as possible (e.g., 100 or 200) to get the cleanest, most detailed images. Higher ISO settings introduce “noise” or “grain,” which can make your photos look gritty.
- When to increase it: If you’re in a dimly lit room and can’t get enough light with your aperture and shutter speed, then, and only then, will I reluctantly increase my ISO. But I always try to find more light first!
White Balance: Capturing Perfect Skin and Wig Colors
White balance tells your camera what “white” looks like under different lighting conditions, ensuring your colors are accurate.
- My method: I usually set my white balance manually or use a custom setting. If you’re shooting under window light, try the “Daylight” or “Cloudy” preset. If you’re using a desk lamp, try “Tungsten” or “Incandescent.”
- Why it matters: Incorrect white balance can make your doll’s resin look too yellow, too blue, or too green. Capturing perfect skin and wig colors is essential for showcasing their beauty. I learned this when my doll’s beautiful pale resin kept looking sickly yellow in photos – a quick white balance adjustment made all the difference.
Conclusion: Your Creative Journey Starts Now
My dear friends, we’ve covered a lot of ground today, from harnessing the magic of window light to crafting compelling poses and refining your images with simple edits. Remember, the most important takeaway from all these BJD photography tips is this: creativity and practice are infinitely more valuable than expensive gear. Your passion, your unique eye, and your connection with your doll are your most powerful tools.
I’ve shared my most cherished “secret” techniques, born from years of trial, error, and countless moments of pure joy. I truly believe that BJD photography is about capturing the doll’s anthropomorphic soul and unique personality, not just documenting an object. Every tip on lighting, posing, and composition should serve this ultimate goal of expressing emotion.
So, just like that quiet afternoon many years ago, when my SDGr girl and I discovered the magic of light together, I hope you now feel empowered. Pick up your phone, find a patch of light, and tell your doll’s story. Don’t be afraid to experiment, to fail, and to learn. Your creative journey starts now, and I can’t wait to see the magic you and your dolls create together. Go forth and make art!
BJD for Beginners: The Complete Guide
- A Parent’s Guide to Choosing BJD Dolls for Kids
- Your First BJD: The Ultimate Guide for Beginners (2025)
- What is a BJD Doll? A Guide to Your Next Obsession
- How to Get Into BJD: A Guide From a Long-Time Collector
- BJD Full Set: More Than a Doll, It’s a Story in a Box
- BJD Sizes Explained: The Ultimate Guide to Ball Jointed Doll Dimensions (2025)
- How to Buy Your First BJD: A Step-by-Step Guide for Beginners
- The Resin Guardian’s Handbook: A Lifelong Guide to BJD Care and Maintenance
- Awakening the Soul: A Philosophy for Customizing Your BJD
- BJD Accessories Guide: Crafting a Universe for Your Doll
- Joining the BJD Community: Your Warm and Welcoming Guide to Doll Collecting
- Unlocking the Soul: A Beginner’s Guide to BJD Photography Magic
- The Ultimate Guide to Buying & Selling Secondhand BJDs Safely & Smartly
- Navigating Your First BJD: An Empathetic & Realistic BJD Budget Guide for New Collectors
- Ultimate BJD Care Guide: Daily Habits to Prevent Yellowing & Damage
- BJD Eyes: The Ultimate Guide to Bringing Your Doll’s Soul to Life
- Master Indoor BJD Photography: Pro Tips for Magical Shots With Basic Gear (You are here)
- BJD Unboxing 101: Your Step-by-Step Guide to a Joyful First Look
- BJD Posing Guide for Beginners: Express Emotion Without Damaging Your Doll
- You’re Welcome to the BJD Community: A Guide to Sharing, Learning & Friends
- The Definitive BJD Secondhand Buying Guide: Spot Deals & Avoid Scams